
How to stage any size XML profile with a single barcode
Overview
This blog describes a very simple method of staging a XML profile of any size with a single PDF417 barcode . The method used is to remotely host the XML contained in the profile and then use a simple 2-step bootstrap profile to download the XML and apply it on the target device. As the bootstrap only contains 2 steps (one FileMgr step to download the XML and one Batch step to process it) it will always fit into a single 2D barcode when generated with either XML or JS barcodes. The files referenced in the profile should be hosted on a remote HTTP/HTTPS server which is accessible via a network connection on the target device. A cloud storage service such as Gdrive could be used for this purpose but is not recommended as the process to convert the Gdrive shared link is long-winded and requires additional steps as detailed here: Zebra OS Upgrade/Downgrade with Gdrive Hosted Files | Developer Portal
Usage
- Download the required SendTo shortcut and utility files from: https://drive.google.com/file/d/1ZYZaVKuOlHuqLBsmipIWt1e2cOmDPuMm/view?usp=sharing
- Extract all files to the SendTo folder on your PC (access directly by Win+R, type shell:sendto and press enter) preserving the sub-folders
- Create a new environment variable ( https://www.computerhope.com/issues/ch000549.htm ) named RXML which contains the path of the base folder of the remote HTTP server which will be used for hosting the profile files
- Check the environment variable is correct by opening a command window and typing SET RXML and pressing enter which displays the current path as per the example below:

- Create a working folder on your PC e.g. bootstrap
- Make a new profile sub-folder in the working folder ensuring that the sub-folder name and profile name are the same.
- Copy the required APK file(s) to this sub-folder
- Select all of the required APK file(s) , right click and select gen_xml_install from the list
- This will create an installer profile.XML file with the profile/folder name in the working folder
- The XML file contains the required FileMgr steps to download the APK files from the remote server path specified by RXML/profile and install them via AppMgr
- Copy the APK and XML files from the profile folder to the RXML/profile path using whichever method works for accessing the remote HTTP server e.g. via FTP/FTPS or a cloud service such as MultCloud
- Test the profile.XML file by copying to onto the device to ensure that it works as intended . You can use the StageNow Export tester utility here Testing XML Exported from StageNow before EMM Deployment | Developer Portal (zebra.com) to do this.
- After successful test the profile can be installed either by:
- StageNow profile – in this case, the _import_to_stagenow.xml in the profile folder contains a bootstrap profile which can be imported into StageNow via the All Profiles / Import Profile option . Once imported, rename the profile from the default (server_ ) to match the profile name and then generate either XML and/or JS barcodes as required
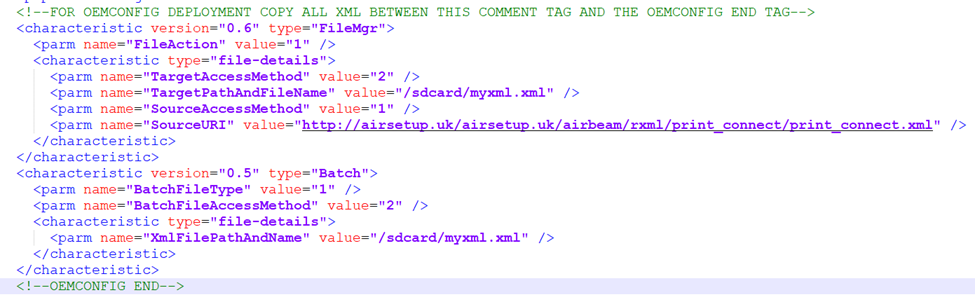
- EMM – using OEMConfig (com.zebra.oemconfig.release) in an EMM profile , copy a portion of the bootstrap XML from _import_to_stagenow.xml into the XML Passthrough field under System Configuration . Make sure that the XML pasted into the Passthrough field is only that contained within the two comments in green below i.e. no additional header or footer tags
Notes:
- The XML generated by this method can be manually edited to add more functionality e.g. if a system setting is required to be modified it can be added to the generated XML before deployment. If doing this, check the XML syntax by clicking on it in File Explorer in order to load it into a browser – this will show any syntax errors.
- Additional XML for settings etc can be exported from a StageNow profile using the Export for MDM option on the Publish screen in StageNow
- If manual edits are made , do not repeat the automatic generation process or it will overwrite any edits made in the file
- Do not include any sensitive information in the XML profile e.g. if you add a WiFi configuration , make sure that the passkey is encrypted in the StageNow profile before exporting the XML

Ian Hatton


0 Replies