DataWedge Barcode Highlighting
DataWedge 11.2 introduces new, powerful options to capture data with advanced "Workflows" including the ability to highlight specific barcodes in the field of view, capture images with the scanner and OCR (optical character recognition) for real world objects such as ID cards or vehicle license plates.
This is the first part of a series of posts about the new Workflows feature. Other posts can be found here:
- Barcode Highlighting
- Free-Form image capture
- DataWedge OCR | What it is and how to control it
- DataWedge OCR | Identity Documents
Documentation for this feature is spread over multiple sections on the techdocs portal:
- The Barcode Input plugin section for barcode highlighting
- The Barcode Highlighting Programmer's Guide
- The Changes to the Notification API for Workflow
Barcode Highlighting
You can highlight barcodes in the current field of view which meet your specified criteria. Optionally, you can then choose to also decode these barcodes and return them to the application.

Example showing barcode highlighting configured to set PDF417 barcodes to orange and Code128 barcodes less than 13 characters to blue.
Possible uses for Barcode Highlighting:
- Provide onscreen feedback to let the operator know which barcodes are being captured
- Help the operator find an item by highlighting the barcode
How to configure Barcode Highlighting:
Barcode highlighting is part of the Barcode Input plugin, not the separate Workflow Input plugin.
To configure barcode highlighting, configure your DataWedge profile as follows:
- Enable Barcode Highlighting in the Barcode input plugin
- Press the ellipsis to bring up additional parameters
- Specify the highlighting rules:
- Create a different rule for each barcode type or colour you want to show
- You can have multiple rules with different colours
- Specify the conditions for the rule:
- The max / min length of the barcode
- Any string it might contain
- The barcode symbology.
- Rules are executed in priority order from top to bottom
- Specify the reporting rules. If you do not specify the reporting rule, your barcode(s) will not be sent to your app.
- Reporting rules and highlighting rules have different conditions, meaning you can choose to report different barcodes than what are being highlighted, though it is recommended to keep these rule the same.
- Specify the reporting action to have these barcodes returned to the application.

Configuration screen to specify highlighting rules based on the barcode contents.
How to use Barcode Highlighting
- The hardware or software trigger will initiate the scanning session
- When a barcode meeting the specified criteria is seen in the viewfinder, it will be highlighted.
- The next trigger will end the session and return decoded barcodes back to the app, if configured to do so.
Video Demos of Barcode Highlighting
The following video shows barcode highlighting via the Imager:
Notice how the different symbologies or barcode lengths were assigned different colours, as defined by the rules.
Also notice how data is returned in a JSON array (output to the text field without modification in the video).
The following video shows barcode highlighting via the Camera:
The video also shows how the highlighting rules are configured with DataWedge. The rules are configured to highlight and report EAN13 barcodes of any length and with any contents.
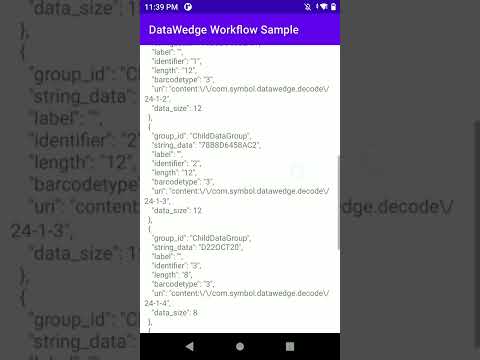
Coding and Barcode Highlighting: Receiving Data
Although part of the Barcode input plugin, barcode highlighting borrows a lot of its logic from the Workflow plugin. What that means for you as a developer is you should follow the Workflow programmer's guide to extract data returned from the Intent output plugin, though there will be no image data.
//  Given the data returned via 'intent'
String data = intent.getStringExtra("com.symbol.datawedge.decode_data");
JSONArray dataArray = new JSONArray(data);
for (int i = 0; i < dataArray.length(); i++)
{
  JSONObject workflowObject = dataArray.getJSONObject(i);
  if (workflowObject.has("string_data"))
  {
    String label = workflowObject.getString("label");
    if (label.equalsIgnoreCase(""))
    {
      //  Each data decoded barcode is stored in workflowObject.getString("string_data")
      //  Symbology returned in workflowObject.getString("barcodetype")
    }
  }
}
Coding and Barcode Highlighting: Configuring DataWedge
There are 2 ways to configure barcode highlighting in code
1. At Runtime:
A new API has been been introduced in DataWedge 11.2, Switch Data Capture to allow you to switch from 'regular' scanning, to barcode highlighting. A full code example is given in the help docs but as a high level summary:
Intent i = new Intent();
i.putExtra("com.symbol.datawedge.api.SWITCH_DATACAPTURE", "BARCODE");
//  Add highlighting rules
Bundle paramList = new Bundle();
  paramList.putString("scanner_selection_by_identifier", "INTERNAL_IMAGER");
  paramList.putString("barcode_highlighting_enabled", "true");
Bundle rule1 = new Bundle();
  rule1.putString("rule_name", "Rule1");
Bundle rule1Criteria = new Bundle();
Bundle bundleContains1 = new Bundle();
  bundleContains1.putString("criteria_key", "contains");
  bundleContains1.putString("criteria_value", "090986");
  ArrayList<Bundle> identifierParamList = new ArrayList<>();
    identifierParamList.add(bundleContains1);
    rule1Criteria.putParcelableArrayList("identifier", identifierParamList);
//  Similar logic for criteria
...
ArrayList<Bundle> ruleList = new ArrayList<>();
  ruleList.add(rule1);
Bundle ruleBundlebarcodeOverlay = new Bundle();
  ruleBundlebarcodeOverlay.putString("rule_param_id", "barcode_overlay");
  ruleBundlebarcodeOverlay.putParcelableArrayList("rule_list", ruleList);
  ArrayList<Bundle> ruleParamList = new ArrayList<>();
    ruleParamList.add(ruleBundlebarcodeOverlay);
    paramList.putParcelableArrayList("rules", ruleParamList);
i.putExtra("PARAM_LIST", paramList);
sendBroadcast(i);
I strongly recommend you copy / paste the example from techdocs and modify as needed
2. Persistently:
A new section has been added to the existing SetConfig API for Barcode Highlighting Parameters. The format passed to SetConfig is very similar to that passed to the new 'Switch Data Capture' API, i.e. create a nested bundle structure for rules, actions and criteria.
For a full example of barcode highlighting through SetConfig please see the Techdocs example
Again, I strongly recommend you copy / paste the example and modify as needed
Coding and Barcode Highlighting: Registering for change
The RegisterForNotification API has been updated to report the status of the workflow plugin and since barcode highlighting is implemented by the workflow plugin (though presented separately on the UI) it follows the same lifecycle.
Register to receive the Workflow notifications. See the RegisterForNotification docs or this app for more detailed code:
Bundle b = new Bundle();
b.putString("com.symbol.datawedge.api.APPLICATION_NAME", getPackageName());
b.putString("com.symbol.datawedge.api.NOTIFICATION_TYPE", "WORKFLOW_STATUS");
Process the received notification
case "WORKFLOW_STATUS":
  Log.d(LOG_TAG, "WORKFLOW_STATUS: status: " + b.getString("STATUS");
  break;
Be aware: Any Intent API sent to DataWedge before the 'PLUGIN_READY' status will lead to undefined behaviour.
Some additional notes for Barcode Highlighting:
- Reporting will only report barcodes meeting the specified criteria currently highlighted in the viewfinder. If you want to capture barcodes outside the viewfinder, for example, if you are waving the device across multiple barcodes, then you should use the 'Freeform Image Capture' Workflow.
- Captured Barcodes are reported in the same way as "Workflow" data capture. I.e. the Intent plugin will report the result through
com.symbol.datawedge.data - The order the results are given will be the order in which the barcodes were recognised by the decoding algorithm, this is not something the user can influence. An
identifierfield is returned in the JSONObject for each barcode captured. - If multiple barcodes are captured, the value returned in
com.symbol.datawedge.data_stringwill be concatenated without any separators. It is strongly recommended to usecom.symbol.datawedge.datainstead. - If you switch scanners when configuring DataWedge, your highlighting rules will be lost (with this initial release)
- As stated in the documentation, the keystroke output will concatenate all the data without any separators. This means the Intent plugin is really the only viable way to receive data.

Darryn Campbell