Developing Android Apps for the HD4000 | Part 1 - Getting Started
Introduction
This is part 1 of a 3-part series, designed to take you from having no experience with our HD4000 (A.K.A Heads-Up-Display, or HUD for short) to being able to use every feature available in the SDK.
Our HD4000 was initially released in November 2019. If you simply want to learn more about the product, you can find all of the information on our product page: https://www.zebra.com/us/en/products/mobile-computers/wearable-computers/hd4000.html
In the first part of this series, we will cover the basics of adding the SDK to your application as well as configuring & connecting to the HUD unit.
Pre-requisites
Before we can do anything with the HUD, we first need to install the service Application. This application needs to be on any device before we can interface with the HUD, as it controls all the USB management & communication with the HUD for us. The APK can be downloaded from the attachments section at the bottom of this post.
Adding the SDK to your application
Once we’ve got the service application installed on the device, we can start developing our application. Just like with any other SDK, we need to add it into our project. At the time of writing, our SDK is distributed via an .aar file, which you can download here. You’ll need to fill out a short form requesting access and, once approved, you should receive the SDK via email.
Having obtained the .aar file, we need to add it to our application. The following steps outline how to do this:
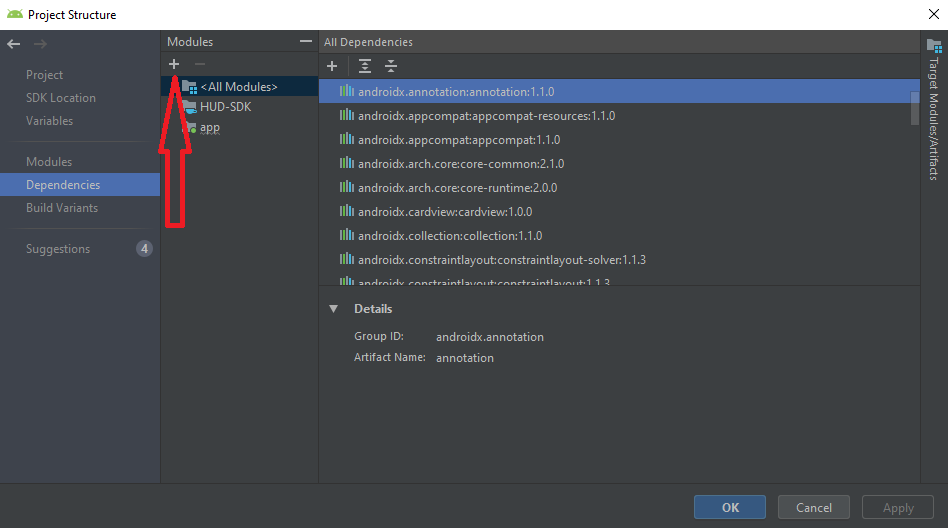
1. Open the project structure by right-clicking on your project and choosing “Open Module Settings” or choosing “File” > “Project Structure…”
2. Click the “+” button in the top left to add a new module.
4. Find the HUD SDK using the ellipsis button (“…”) beside the “Filename” field. Studio will automatically create a subproject name. Just click “Finish”.
5. Gradle will sync, which may take a few minutes. Add the new module as a dependency to your app. In the “Project Structure…” window, a new module has appeared representing the SDK. Keep the app’s module selected.
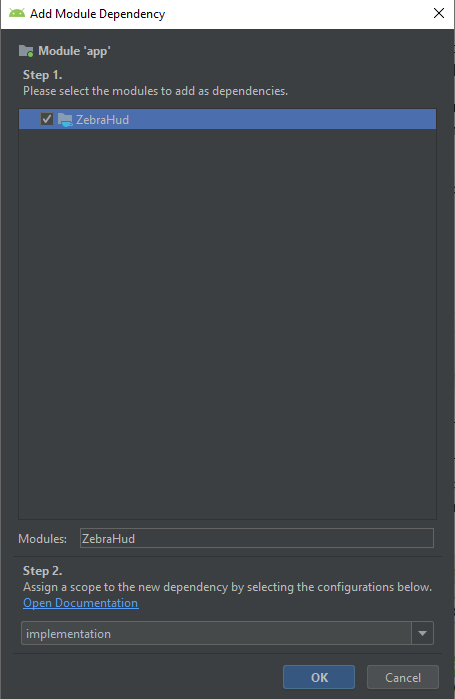
6. Use the “+” button at the top of the dependencies screen and choose “module dependency”.
7. The screen that pops up should show the ZebraHud SDK. Just click “OK”.
Adding Gradle Dependencies
The HD4000 SDK relies on several dependencies, namely: Androidx, Kotlin & GSON. Androidx is used to design the HUD layouts, the SDK is written in Kotlin, and GSON is used to parse the JSON Image Model (these are discussed in part 3).
In order to support the SDK, ensure your application has the following dependencies in your build.gradle file:
implementation 'androidx.core:core-ktx:1.2.0'
implementation 'com.google.code.gson:gson:2.8.6'
implementation "org.jetbrains.kotlin:kotlin-stdlib-jdk7:1.3.71"
Configuring the HUD
The first thing we need to do to configure the HUD is to create an instance of the ZebraHud class and assigning it to a member variable:
private ZebraHud mZebraHud = new ZebraHud();Once we have an instance of the ZebraHud object, we can then configure it to match our requirements:
mZebraHud.setDisplayOn(true);
mZebraHud.setScale(100);
mZebraHud.setBrightness(100);
mZebraHud.setCameraEnabled(true);
mZebraHud.setMicrophoneEnabled(true);
mZebraHud.setOperationMode(ZebraHud.OperationMode.NORMAL);
Most of these parameters are self-explanatory. Firstly, we want to make sure our display is turned on. We can then configure the scale & brightness of the HUD unit. For scale, the HUD unit supports five values: 80, 85, 90, 95 & 100. For brightness you can enter any value, however, these will be rounded up to either 25, 50, 75 or 100% depending on the value you input (e.g. if you enter 26, it will be rounded to 50% and if you enter 24, it will be rounded to 25%). Next, we can enable or disable the microphone & camera on the HUD, which will depend on your use-case. Finally, we need to set the operation mode. Currently, the HUD supports two modes of operation: NORMAL & SCREEN_MIRRORING. NORMAL is to be used when you want your application to display specific images, messages or views (which we will cover in part 2 of this series) & SCREEN_MIRRORING can be used to, somewhat obviously, mirror the screen of the device onto the HUD. This feature is useful for testing or quick demonstration purposes but given the relatively low resolution of the HUD display, is probably not too appropriate for a real-world use-case.
Connecting to the HUD
Once we’ve created an instance of the ZebraHud and set the configuration options we need, we can start implementing the functions required to communicate with the HUD.
The first thing we need to do is implement the lifecycle methods: onStart(), onResume(), onPause() & onStop().
In onStart() and onPause() we simply need to call the same methods on our instance of the ZebraHud so that it is aware of our lifecycle:
@Override
protected void onStart() {
    super.onStart();
    if (mZebraHud != null) {
        mZebraHud.onStart(this);
    }
}
@Override
protected void onPause() {
super.onPause();
if (mZebraHud != null) {
mZebraHud.onPause(this);
}
}onStop() is similar, however we need to make sure we clear the display if our application is finishing. To do this, we make a quick check with isFinishing(), and if we are, then we can call clearDisplay() on our instance of ZebraHud. We also need to pass the result of the isFinishing() method to the onStop function of the ZebraHud:
@Override
protected void onStop() {
    super.onStop();
    if (mZebraHud != null) {
        if (isFinishing()) { mZebraHud.clearDisplay(); }
        mZebraHud.onStop(this, isFinishing());
    }
}
Finally, and most importantly, in onResume we need to register our ZebraHudEventsListener interface to our ZebraHud Instance. To do this, we call onResume on our ZebraHud instance, and pass through a new instance of our ZebraHud.EventListener interface:
@Override
protected void onResume() {
    super.onResume();
    if (mZebraHud != null) {
        mZebraHud.onResume(this, new ZebraHud.EventListener() {
            @Override
            public void onConnected(Boolean aBoolean) {

            }

            @Override
            public void onImageUpdated(byte[] bytes) {

            }

            @Override
            public void onCameraImage(Bitmap bitmap) {

            }
        });
    }
}
We’re now ready to communicate directly with the HUD! You should be able to plug a HUD unit into your device (make sure the Six-15 application is installed!) and be notified in the onConnect() callback in the ZebraHudEventsListener interface.
If you want to skip straight ahead to part 3 where we discuss JSON Image Models (Using JSON files to create HUD screens) then click here!

James Swinton-Bland


