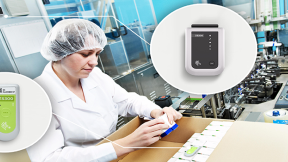

Cold Chain Tracking with Zebra Electronic Temperature Sensors
Overview
Combining Bluetooth Low Energy and Cloud technologies, Zebra brings cold chain tracking to a completely new level with its innovative Electronic Temperature Sensors solution that consists of hardware devices, companion mobile apps, and REST APIs. The hardware devices are the ZB200 Bridges and the ZS300 Sensors. The companion mobile apps are: ZBSetup and ZSFinder, which are available on Google Play.
The ZB200 bridges connect to the Zebra cloud either through an ethernet connection (via an RJ45 connector) or through the Wi-Fi (configured by the ZBSetup app). The bridges periodically scan for the sensors’ Bluetooth Low Energy (BLE) advertisement packets, connect to the sensors, and upload the sensors’ data to the cloud.
The ZSFinder is an Android™ service that acts as a software bridge in the absence of the hardware bridge and for 'On-The-Go' use cases. In addition, the ZSFinder provides AIDL interfaces for 3rd party apps on the same Android device to access the nearby sensors’ data and status in real time. A service token or an API key is required to use the ZSFinder Android™ service.

The Electronic Temperature Sensors REST API has four sub-categories:
These individual API pages define the details for the respective API.

The Management API is for managing the sensors and tasks, such as enrolling sensors, creating tasks (with specific configurations, such as the time/conditions to start a task, the low/high-temperature limits for alarms, the temperature sampling interval, etc.), adding sensors to a task, and stopping a task, etc. The Data Reporting API is for retrieving the temperature data samples from the cloud, where the data is stored and preserved for 7 years. The Event Subscription API is for subscribing to real-time events, such as alarms triggered when the temperature is out of bounds. The Android Service Token API is for obtaining a device token for the ZSFinder app that requires a token or an API key to function.
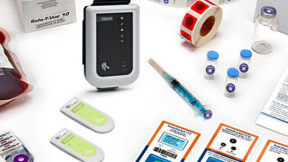
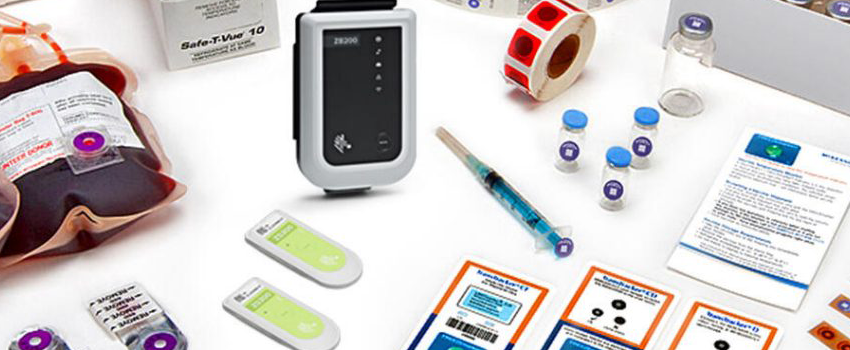
ZB200 Bridge
The ZB200 bridges are equipped with Wi-Fi (802.1 a/c) and ethernet connectivity and are powered by a USB-C adapter. The Bluetooth LE v4.1 on the bridges is used for communicating with the sensors, and for setting up the Wi-Fi through the ZBSetup app. To configure the Wi-Fi, the bridge needs to be in Bluetooth pairing mode, which can be activated by pressing the BT pairing button for 2 seconds until the Status LED blinks blue. The bridge will exit the pairing mode automatically if it is not paired and connected to the ZBSetup app in 2 minutes.
There are 5 LED indicators on the face cover of the bridge to indicate various statuses. When the bridge is connected to the cloud successfully, there will be three solid green LEDs - the green Status LED, the green Cloud LED, and the green Ethernet (or the Wi-Fi) LED. If we don’t see the 3 solid green LEDs, the bridge is not successfully connected to the cloud and its internet connection needs to be checked.

ZB300 Sensor
The ZS300 sensors operate in the temperature range of -40°C to +85°C (-40°F to 185°F) with an accuracy of ±0.3°C and a resolution of 0.01°C. The QR code contains the sensor’s BLE MAC address, the serial number, and the model number in a URL format, for example, http://www.zebra.com/apps/r/qr?m=00074DCDAF6A&n=ZS300_DLJ215100951&v=0. The LED has 3 colors: red, green, and yellow. By default, the sensors are in deep sleep mode to conserve the battery, which provides 12 months of operation (varies by usage). A long button press (3 seconds) will wake the sensor from its deep sleep and the LED will start blinking yellow. The sensor goes back to deep sleep again after 3 minutes if it has not been added to a task.
If the LED blinks in yellow after the button is pressed, it means the sensor has not been enrolled or has not been added to a task. If the LED blinks in red or in green after the button is pressed, it means that the sensor is active with alarm or without alarm, respectively. If the LED blinks in green and yellow alternately, it means the sensor is in the 'start-delayed' mode.

ZBSetup App
ZBSetup is an Android app used for configuring the Wi-Fi of the bridge.
ZSFinder App
ZSFinder is an Android service that acts as a software bridge in the absence of a ZB200 physical bridge. It enables cold chain tracking for On-The-Go use cases and provides an AIDL interface which 3rd party apps can use to access nearby sensor data and status in real time. See the blog, Getting Started with the ZSFinder SDK in an Android Project, about how to interact with the ZSFinder app through the AIDL interfaces.
To use the ZSFinder service, a Zebra Android service token or an API key is required before the service can be run. To obtain a service token, call the Android Service Token API. Here is the example in curl:
### Request example to obtain the service token. The consumer key is also known as the API key.
curl -L -X POST 'https://api.zebra.com/v2/devices/credentials/token' \
-H 'apikey: yourConsumerKey'
The service token always starts with "zt_", as shown below. Don't be confused by the bearer token that is used for calling APIs.
### Response example of obtaining service token
{
    "token": "zt_tNQA5OT4hDmp8oPb1YDOUmGryzfwphJ7"
}
REST APIs
The Electronic Temperature Sensors APIs play a crucial part in developing a cold chain tracking solution. Here is a typical workflow for using our electronic temperature sensors. For simplicity, we use the curl commands to demonstrate how to call the APIs to accomplish the workflow in this section.

Before we get started with the sensor-related REST APIs, let's briefly talk about the Bearer Token and the Tenant ID.
- Bearer Token
A bearer token or an API key is required in the request header when calling any REST APIs. The Electronic Temperature Sensors Developer Guide has detailed information about how to get the API key, Consumer Key, Consumer Secret, etc. As recommended, we will use the bearer token in this section, as it's more secure. A bearer token is valid for an hour. An application can obtain a bearer token by calling the OAuth – Client Credentials API of the OAuth 2.0 Service with the Consumer Key (a.k.a. API key, Client ID) and Consumer Secret (a.k.a. Client Secret). Below are examples of the bearer token request and response.
### Bearer token request example in curl
curl -L 'https://api.zebra.com/v2/oauth/token/access' \
-H 'client_id: yourConsumerKey' \
-H 'client_secret: yourConsumerSecret'
### Response example of the bearer token request. The token expires in 3599 seconds (1 hour).
{
"access_token": "j6azltZhraFKsCWRA4i3RMzEB7Qo", /* Bearer Token */
"expires_in": "3599" /* Valid for 3599 seconds */
}
- Tenant ID
A tenant ID is required when subscribing to real-time events through the Event Subscription API. The tenant ID can be obtained by calling the Tenant Service API with the Consumer Key (a.k.a. API key).
### Tenant ID request example in curl
curl -L 'https://api.zebra.com/v2/mytenant' \
-H 'apikey: yourConsumerKey'
### Response example of the tenant ID request. The value of the AccountNumber is the tenant ID.
[
{
"ownAccount": "true",
"AccountName": "yourEmailAddress",
"AccountNumber": "aa26a0cd13e235750402689a724409b9" /* Tenant ID */
}
]
1. Enroll Sensor
Sensor enrollment means adding a sensor to the database under the tenant. To enroll a sensor, we need to have a bridge connected to the cloud or the ZSFinder app running nearby. Call the sensor enrollment API with a valid sensor serial number to enroll a sensor one at a time. Make sure the sensor is not in deep sleep mode. Press the button to wake up the sensor.
### Request example to enroll a sensor, one sensor at a time.
curl -L 'https://api.zebra.com/v2/devices/sensor-enrollments' \
-H 'Authorization: Bearer yourBearerToken' \
-d '{
  "serial_number": "yourSensorSerialNumber"
}'
Depending on the situation, we may receive different responses from the sensor enrollment request. Below are the common responses to the enrollment request. If the response is 200 OK, it only means the enrollment request went through successfully. It doesn't necessarily mean the sensor has fully enrolled. To fully enroll a sensor, we need to make sure the sensor is not in deep sleep mode and is within the Bluetooth range of the bridge or the ZSFinder app.
### Response example. Success - 200 OK. Need to verify if the sensor is completely enrolled.
{}
### Response example. Error - 409 Conflict. The enrollment is incomplete. The sensor might be in deep sleep, or out of the Bluetooth range.
{
"code": 6,
"message": "sensor already has pending enrollment",
"details": []
}### Response example. Error - 409 Conflict. The sensor is already enrolled.
{
"code": 6,
"message": "sensor already enrolled on tenant",
"details": []
}2. Verify Sensor Enrollment
Even if we get a 200 success response from the sensor enrollment API call, we still need to verify if the sensor has truly completed its enrollment. The verification is done by calling the list sensors by tenant API with the sensor's serial number as the text_filter.
### Request example to list sensors by tenant with the text_filter of the sensor's serial number.
curl -L 'https://api.zebra.com/v2/devices/environmental-sensors?size=10&text_filter=yourSensorSerialNumber' \
-H 'Authorization: Bearer yourBearerToken'
If the sensor has not been fully enrolled, for example, if the sensor was in deep sleep or out of the Bluetooth range during the enrollment process, the response to the above request would be empty. If that's the case, we need to wake up the sensor and bring the sensor into the range of the bridge or the ZSFinder app.
### Response example. The sensor has not been fully enrolled. No sensor details are returned.
{
    "sensors": [],
    "page_response": {
        "total_elements": 0,
        "size": 10,
        "total_pages": 0,
        "page": 0
    }
}
If the response looks like something below, then it indicates that the sensor has been fully enrolled. The value of the id field in the response JSON is the sensor's ID, which will be used when we associate the sensor with a task.
### Response example. The sensor is fully enrolled and assigned a sensor ID. The sensor details are returned in the response.
{
    "sensors": [
        {
            "id": "bf65b793-9e6a-4642-afa3-9de244dfbb70", /* Sensor ID */
            "mac_address": "00074DDCFCF8",
            "serial_number": "yourSensorSerialNumber",
            "model": "ZS300",
            "manufacturer": "Zebra Technologies",
            "hardware_revision": "2",
            "firmware_revision": "D01.0.1.779",
            "battery_level": 98,
            "name": "ZS300_yourSensorSerialNumber",
            "status": "SENSOR_STATUS_STOPPED",
            "alarm_count": null,
            "first_seen": "2023-04-10T16:09:21.091051Z",
            "last_updated": "2023-04-10T16:09:20.656171Z",
            "notes": "",
            "certificate_url": "https://storage.googleapis.com/spg-zpc-s-envirovue-certs/certificates/ZS300_Sensor_Certificate_of_Conformance_RevB.pdf",
            "most_recent": {
                "task_id": "",
                "sensor_task_id": "",
                "sensor_task_status": "SENSOR_TASK_STATUS_UNSPECIFIED",
                "alarm_count": null
            },
            "requested": {
                "task_id": "",
                "sensor_task_id": "",
                "sensor_task_status": "SENSOR_TASK_STATUS_UNSPECIFIED",
                "alarm_count": null
            },
            "certificate_type": "CERTIFICATE_TYPE_CONFORMANCE",
            "unverified": {
                "last_date_time": "2023-04-10T16:09:21.094483Z",
                "last_temperature": null,
                "last_alarm": false
            }
        }
    ],
    "page_response": {
        "total_elements": 1,
        "size": 10,
        "total_pages": 1,
        "page": 0
    }
}
3. Create a Task
The electronic temperature sensors solution is task-centric. The sensors are managed through their associated tasks. A task defines the number of sensors that can be associated with it, the high/low alarm limits, the temperature sampling interval, the conditions to start the task, etc. Stopping a task will stop all sensors on the task. Active sensors can only be stopped when their associated task is stopped. Only stopped sensors can be re-associated with a task.
To create a task, we must provide the task details in the request body. The task name, sampling interval, and start condition(s) are required fields. To define a task for starting immediately, we simply provide the "start_immediately" element with an empty object in JSON. To define a task for starting at a later time or at certain conditions, we provide the "start_delayed" element with the object of the collective conditions in JSON. The conditions for the start_delayed are: on_button_press, delayed_temp_below, delay_temp_above, delayed_minutes or delayed_until. These conditions are in the logical OR relationship, i.e., the task will start when either one of the conditions is met. See the schema in the create task API on the Management API page for more details.
For simplicity, we will create a task below that starts immediately with the sampling interval of 15 seconds (the minimum interval) and the low/high temperatures of 20°C and 26°C respectively. Only one sensor is required for this task. An alarm will be triggered when the temperature is outside the low or high limit for a duration of one minute.
### Request example to create a task to start immediately
curl -L 'https://api.zebra.com/v2/environmental/tasks' \
-H 'Authorization: Bearer yourBearerToken' \
-d '{
  "task_from_details": {
    "task_details": {
            "name": "my unique task name",
            "interval_minutes": 0,
            "interval_seconds": 15,
            "loop_reads": true,
            "start_immediately": {},
            "sensor_type": "SENSOR_TYPE_TEMPERATURE",
            "alarm_low_temp": 20,
            "alarm_high_temp": 26,
            "notes": "my notes for the task",
            "low_duration_minutes": 1,
            "low_duration_seconds": 0,
            "high_duration_minutes": 1,
            "high_duration_seconds": 0,
            "required_sensors": 1
        }
    }
  }
}'
In the response, the task ID is returned. A task ID is required in various API calls, such as associating sensors to a task, data report, or subscribing to real-time events (Webhook), etc. Some of them will be demonstrated in the later sections of this article.
### Response example of the create task request. The id is the task ID.
{
    "id": "274fc910-3299-4a16-9a4a-8c4b2ca52e79"
}
Check Task Status (Optional)
To check the task status, simply call the task details API with the task ID returned from the previous request above.
### Request example to get the task status and details, with the task ID as part of the request URL.
curl -L 'https://api.zebra.com/v2/environmental/tasks/274fc910-3299-4a16-9a4a-8c4b2ca52e79' \
-H 'Authorization: Bearer yourBearerToken'
In the response, the task status is TASK_STATUS_SENSOR_REQUIRED, which indicates no sensor has been added to the task yet. The task will not start unless it has at least one sensor.
### Response example of the list task details request
{
    "task": {
        "id": "274fc910-3299-4a16-9a4a-8c4b2ca52e79",
        "sensor_count": 0,
        "status": "TASK_STATUS_SENSOR_REQUIRED",
        "sensor_task_status_overview": {
            "active": 0,
            "active_with_alarm": 0,
            "completed": 0,
            "start_pending": 0,
            "stop_pending": 0
        },
        "started": null,
        "ended": null,
        "taskDetails": {
            "name": "my unique task name",
            "created": "2023-04-10T21:17:50.669754Z",
            "updated": "2023-04-10T21:17:50.669758Z",
            "interval_minutes": 0,
            "interval_seconds": 15,
            "loop_reads": true,
            "start_immediately": {},
            "sensor_type": "SENSOR_TYPE_TEMPERATURE",
            "alarm_low_temp": 20,
            "alarm_high_temp": 26,
            "notes": "my notes for the task",
            "low_duration_minutes": 1,
            "low_duration_seconds": 0,
            "high_duration_minutes": 1,
            "high_duration_seconds": 0,
            "required_sensors": 1
        },
        "template_name": "",
        "alarm_count": 0
    }
}
4. Subscribe to Real-Time Events (Optional)
The real-time event subscription (or Webhook) is optional when using the electronic temperature sensors solution. The Webhook is a convenient way for receiving alerts in real-time when the temperature is outside the low/high limits for the specified duration defined in the task. Once a sensor is added to a task, the sensor will start sampling the temperature straight away when it is on a start_immediately task or when a condition is met if it is on a start_delayed task. By design, only the very first alarm on an active sensor will be sent as an alert in real time through the registered Webhook. All the subsequent alarms on the same sensor will not be sent as alerts through the Webhook. The purpose is to focus on and signify the first alarm through the Webhook, and at the same time to reduce the number of alerts from the subsequent alarms on the same sensor, i.e., less chattering.
If you decide to take advantage of the real-time event subscription, it is recommended to call the Event Subscription API to register the Webhook before adding sensors to the task. This is to prevent the alert triggered by the sensor's very first alarm from getting lost before the Webhook is registered.
There are a number of websites offering a Webhook URL that can be used for testing, such as Pipedream.com and Webhook.site. In the example below, we use a URL from Webhook.site in the event subscription. The webhook URL is the only required element in the event subscription request JSON. All the other elements in the event subscription request JSON are optional. A webhookUrl can subscribe to the events from multiple tasks, specified by the taskIds that is an array in the request JSON. If the taskIds is empty, then the webhookUrl subscribes to the events from all tasks under the tenant. The tenant ID is obtained through the Tenant Service API, as shown at the beginning of this section. If the epcis is false (the default), the alert sent to the Webhook is in the UDM format. If the epcis is true, the alert is in the EPCIS format. Please note that the Content-Type: application/json is mandatory in the request header.
### Request example of the event subscription
curl -L 'https://api.zebra.com/v2/devices/environmental-sensors/event/subscription' \
-H 'tenant: yourTenantId' \
-H 'Authorization: Bearer yourBearerToken' \
-H 'Content-Type: application/json' \
-d '{
  "taskIds": [
    "274fc910-3299-4a16-9a4a-8c4b2ca52e79"
  ],
  "epcis": false,
  "name": "my event subscription name",
  "webhookUrl": "https://webhook.site/fd893fd6-59c8-4de4-9ba0-345fe086d6ba",
  "webhookVerb": "POST"
}'
### Response example of the event subscription request
{
"subscription": {
"id": "O68I2N1DO78CNDEQ"
}
}List Subscriptions (Optional)
We can obtain a list of all subscriptions by calling the retrieving all subscriptions API, as shown below.
### Request example to retrieve all subscriptions
curl -L 'https://api.zebra.com/v2/devices/environmental-sensors/event/subscription' \
-H 'tenant: yourTenantId' \
-H 'Authorization: Bearer yourBearerToken'
Each subscription has an ID, which is the value of the id element in the response, as shown below. With the subscription ID, we can stop or start the subscription.
### Response example of retrieving all subscriptions
{
    "subscriptions": [
        {
            "id": "O68I2N1DO78CNDEQ",
            "deviceScope": "SCOVILLE",
            "name": "my event subscription name",
            "partner": "",
            "userTags": [],
            "changeFields": [
                "webhookTrigger"
            ],
            "deviceIdentifiers": [
                "274fc910-3299-4a16-9a4a-8c4b2ca52e79"
            ],
            "jqFilters": {},
            "jqTransform": {},
            "epcis": false,
            "webhookUrl": "https://webhook.site/fd893fd6-59c8-4de4-9ba0-345fe086d6ba",
            "webhookVerb": "POST",
            "headers": {},
            "rawData": [
                "webhookTrigger"
            ]
        }
    ]
}
5. Add Sensor to Task
Multiple sensors can be added to a task in one request. The sensors are specified by the sensor IDs in the sensor_ids array. The task ID is specified as part of the URL.
### Request example of adding a sensor to the task
curl -L 'https://api.zebra.com/v2/environmental/tasks/274fc910-3299-4a16-9a4a-8c4b2ca52e79/sensors' \
-H 'Authorization: Bearer yourBearerToken' \
-d '{
  "sensor_ids": [
    "bf65b793-9e6a-4642-afa3-9de244dfbb70"
    ]
}'
Once a sensor is added to the task successfully, a sensor task is created and assigned a sensor_task_id, as shown in the response example below. Please note that the sensor might be in deep sleep when it was added to the task. If that's the case, we need to wake up the sensor by long pressing the button for 3 seconds. Otherwise, both the task and the sensor task would remain in the start pending state, until the sensor is out of deep sleep.
### Response example of adding the sensor to the task
{
    "associated_sensors": [
        {
            "sensor_id": "bf65b793-9e6a-4642-afa3-9de244dfbb70",
            "sensor_task_id": "3743613a-b8ed-41b1-9016-8c1dda2a365c"
        }
    ],
    "failed_sensors": []
}
6. Check Webhook Events
After adding the sensor to the task (and waking up the sensor, if needed), the LED on the sensor should blink green after the button is pressed in the room environment setting. This means the sensor is now active without alarm. Alarms should not occur when the sensor is at room temperature, because the low and high-temperature limits were set at 20°C and 26°C respectively when the task was created in step 2.
To see the alarm and Webhook event in action, we need to first open a browser pointing to the webhook.site with the ID in the Webhook URL that was used at the event subscription. In step 4, the https://webhook.site/fd893fd6-59c8-4de4-9ba0-345fe086d6ba was used in the event subscription, where the "fd893fd6-59c8-4de4-9ba0-345fe086d6ba" is the ID. Now, we need to open a browser with the URL of https://webhook.site/#!/fd893fd6-59c8-4de4-9ba0-345fe086d6ba, which has the "#!" added in the URL path before the ID of "fd893fd6-59c8-4de4-9ba0-345fe086d6ba". Now the webhook.site webpage in the browser is listening to and waiting for an event to happen.
After the webhook.site page is opened in the browser, we can then drop the sensor into a cup of ice water. After about a minute or so, the sensor temperature will drop below 20°C, subsequently generate an alarm and trigger an event being sent up through the Webhook. The Webhook event will be captured by the webhook.site page in the browser. At the same time, the sensor LED will blink in red, meaning an alarm has occurred.
Here is a screenshot to show the Webhook event captured in the browser.
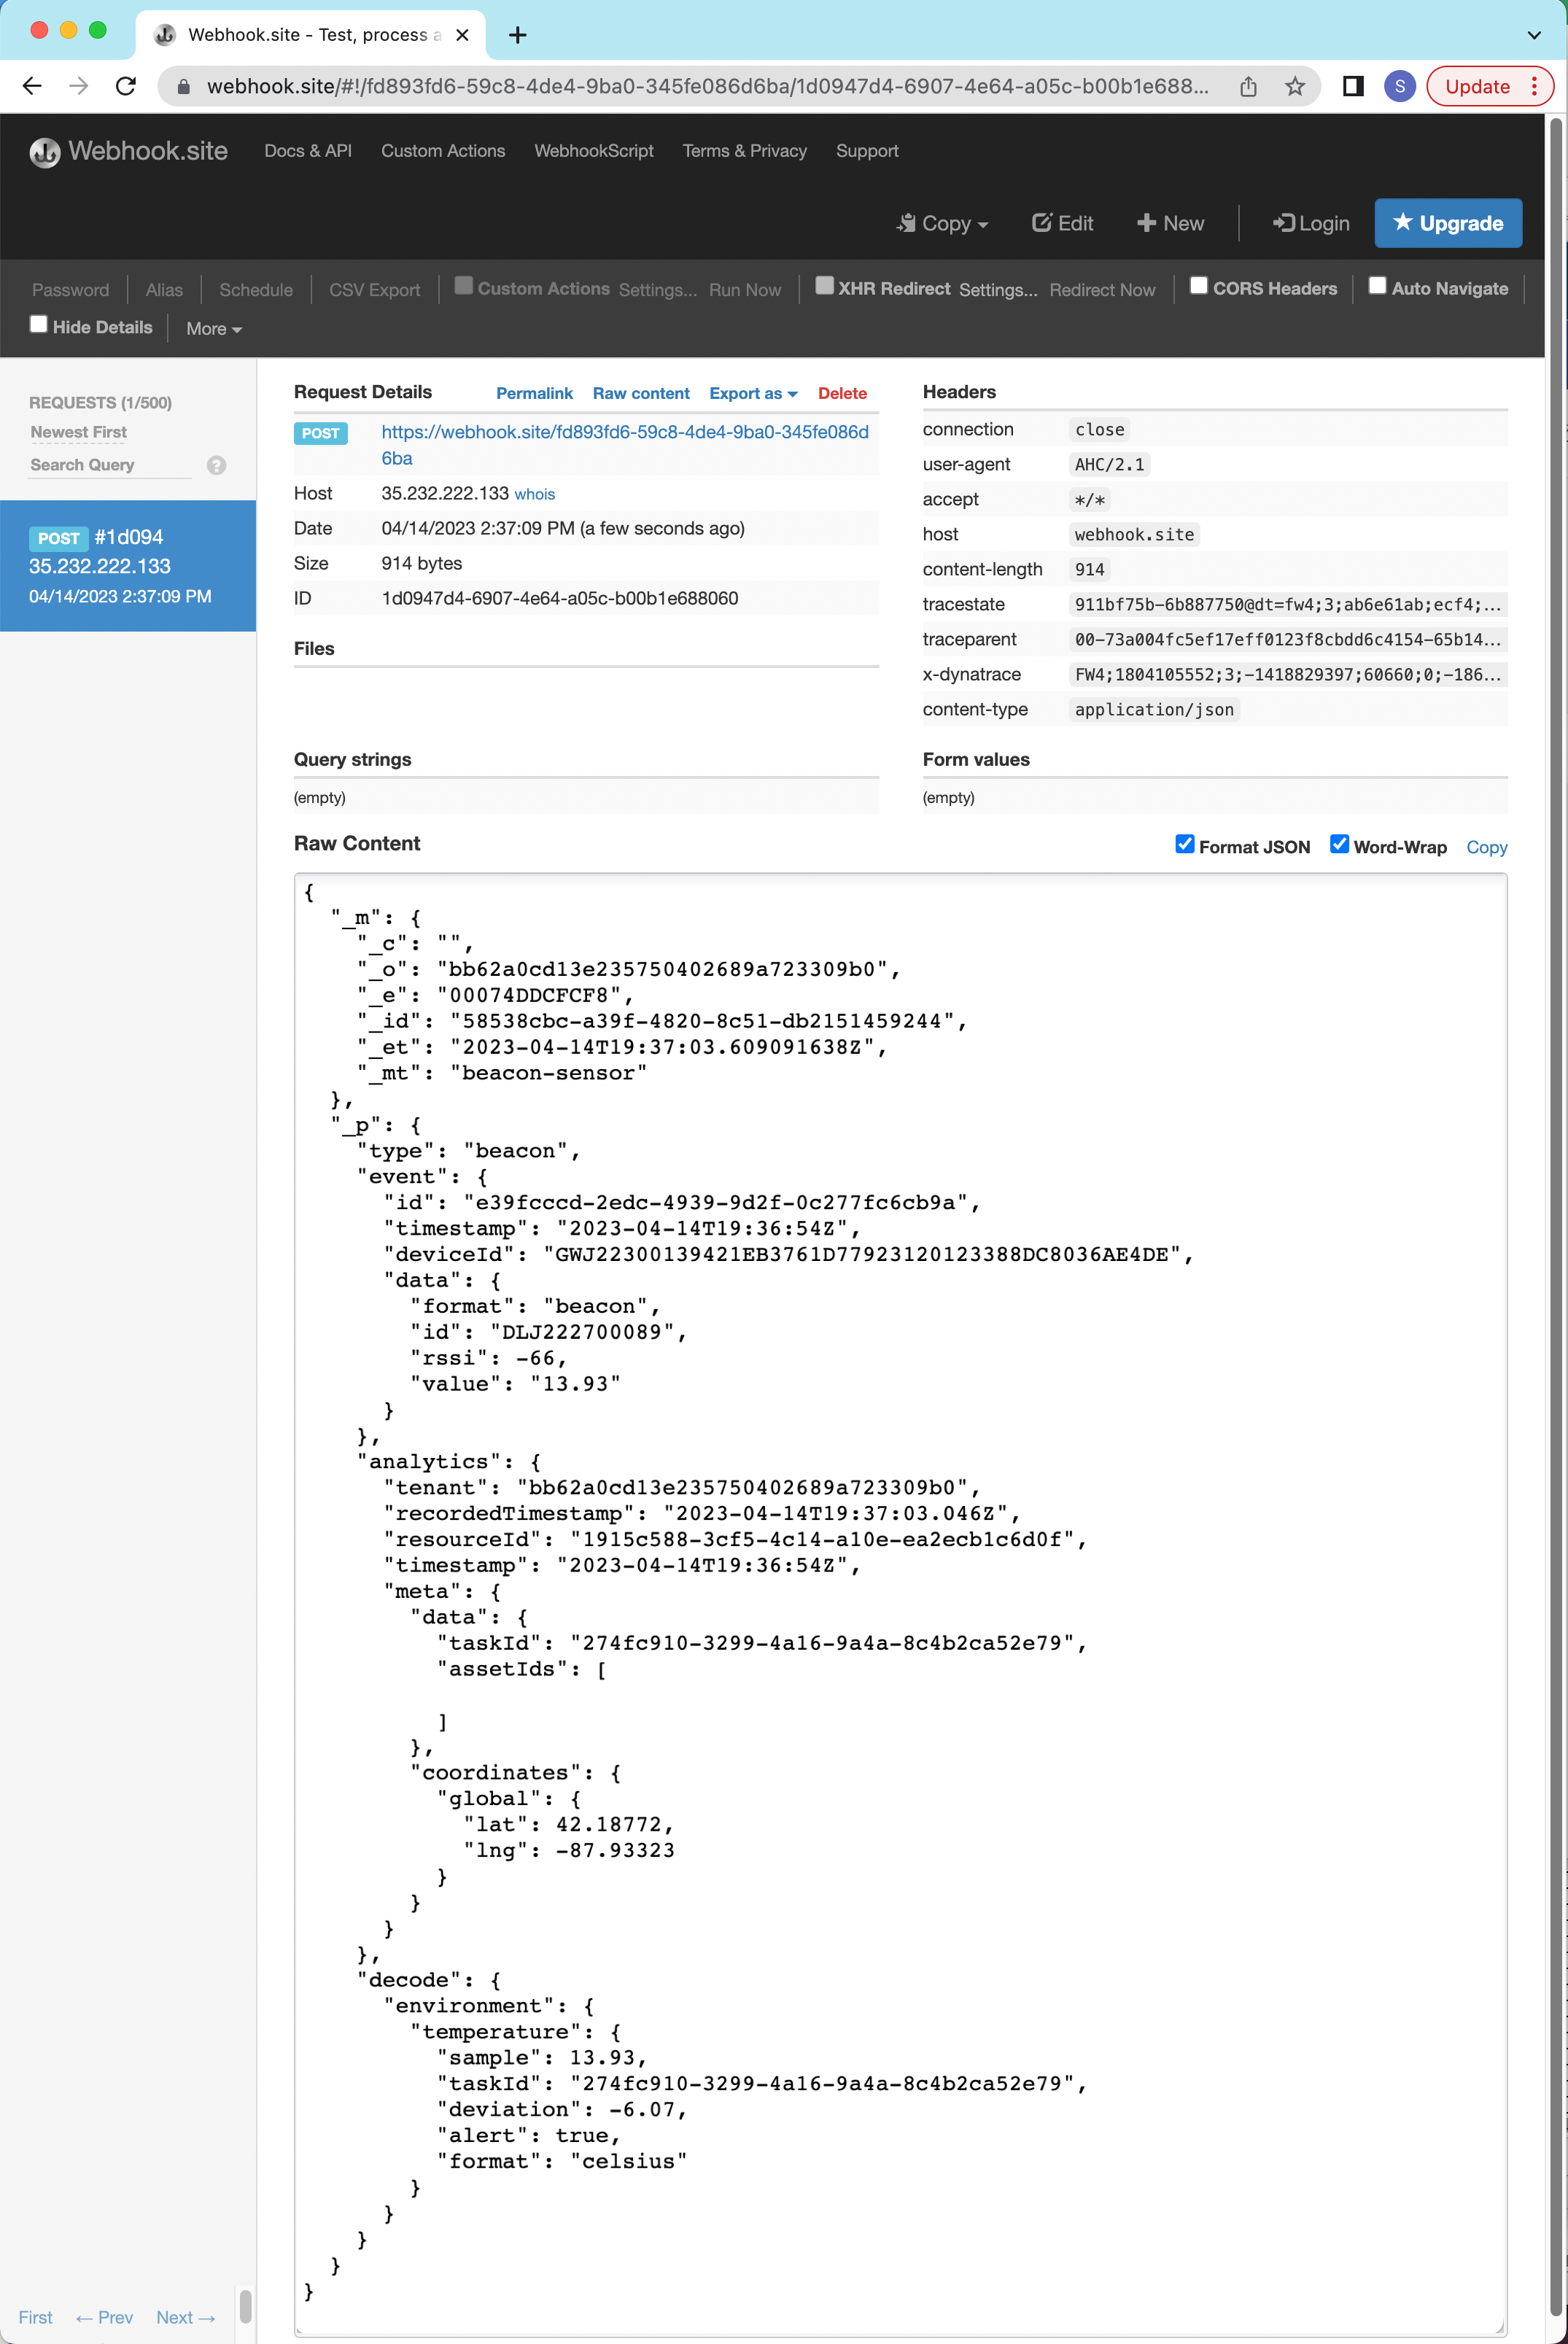
Below is the data of the captured Webhook event in JSON format.
### The data of the Webhook event in JSON
{
  "_m": {
    "_c": "",
    "_o": "bb62a0cd13e235750402689a723309b0",
    "_e": "00074DDCFCF8",
    "_id": "58538cbc-a39f-4820-8c51-db2151459244",
    "_et": "2023-04-14T19:37:03.609091638Z",
    "_mt": "beacon-sensor"
  },
  "_p": {
    "type": "beacon",
    "event": {
      "id": "e39fcccd-2edc-4939-9d2f-0c277fc6cb9a",
      "timestamp": "2023-04-14T19:36:54Z",
      "deviceId": "GWJ22300139421EB3761D77923120123388DC8036AE4DE",
      "data": {
        "format": "beacon",
        "id": "DLJ222700089",
        "rssi": -66,
        "value": "13.93"
      }
    },
    "analytics": {
      "tenant": "bb62a0cd13e235750402689a723309b0",
      "recordedTimestamp": "2023-04-14T19:37:03.046Z",
      "resourceId": "bf65b793-9e6a-4642-afa3-9de244dfbb70",
      "timestamp": "2023-04-14T19:36:54Z",
      "meta": {
        "data": {
          "taskId": "274fc910-3299-4a16-9a4a-8c4b2ca52e79",
          "assetIds": [

          ]
        },
        "coordinates": {
          "global": {
            "lat": 42.18772,
            "lng": -87.93323
          }
        }
      }
    },
    "decode": {
      "environment": {
        "temperature": {
          "sample": 13.93,
          "taskId": "274fc910-3299-4a16-9a4a-8c4b2ca52e79",
          "deviation": -6.07,
          "alert": true,
          "format": "celsius"
        }
      }
    }
  }
}
7. Stop Task
To end the temperature tracking, call the task stop API with the task ID to stop the task. This will stop all the sensors associated with the task. The task will initially enter the stop pending state. After all sensors stop their sensor tasks, the task will enter the sensor completed state.
### Request example to stop a task
curl -L -X POST 'https://api.zebra.com/v2/environmental/tasks/274fc910-3299-4a16-9a4a-8c4b2ca52e79/stop' \
-H 'Authorization: Bearer yourBearerToken'
### Response example of stopping a task. Immediately, the task enters the stop pending state.
{
"task": {
"id": "274fc910-3299-4a16-9a4a-8c4b2ca52e79",
"sensor_count": 1,
"status": "TASK_STATUS_STOP_PENDING",
"sensor_task_status_overview": {
"active": 0,
"active_with_alarm": 0,
"completed": 0,
"start_pending": 0,
"stop_pending": 1
},
"started": "2023-04-14T18:19:40.278451Z",
"ended": null,
"taskDetails": {
"name": "my unique task name",
"created": "2023-04-10T21:17:50.669754Z",
"updated": "2023-04-14T20:25:06.106741Z",
"interval_minutes": 0,
"interval_seconds": 15,
"loop_reads": true,
"start_immediately": {},
"sensor_type": "SENSOR_TYPE_TEMPERATURE",
"alarm_low_temp": 20,
"alarm_high_temp": 26,
"notes": "my notes for the task",
"low_duration_minutes": 1,
"low_duration_seconds": 0,
"high_duration_minutes": 1,
"high_duration_seconds": 0,
"required_sensors": 1
},
"template_name": "",
"alarm_count": 1
}
}Wait for a few seconds until the sensor stops its sensor task, the task will enter the sensor completed state, shown below in the response example of retrieving task detail API.
### Response example of retrieving task detail API
{
    "task": {
        "id": "274fc910-3299-4a16-9a4a-8c4b2ca52e79",
        "sensor_count": 1,
        "status": "TASK_STATUS_SENSOR_COMPLETED",
        "sensor_task_status_overview": {
            "active": 0,
            "active_with_alarm": 0,
            "completed": 1,
            "start_pending": 0,
            "stop_pending": 0
        },
        "started": "2023-04-14T18:19:40.278451Z",
        "ended": "2023-04-14T20:25:16.315415Z",
        "taskDetails": {
            "name": "my unique task name",
            "created": "2023-04-10T21:17:50.669754Z",
            "updated": "2023-04-14T20:25:19.465102Z",
            "interval_minutes": 0,
            "interval_seconds": 15,
            "loop_reads": true,
            "start_immediately": {},
            "sensor_type": "SENSOR_TYPE_TEMPERATURE",
            "alarm_low_temp": 20,
            "alarm_high_temp": 26,
            "notes": "my notes for the task",
            "low_duration_minutes": 1,
            "low_duration_seconds": 0,
            "high_duration_minutes": 1,
            "high_duration_seconds": 0,
            "required_sensors": 1
        },
        "template_name": "",
        "alarm_count": 1
    }
}
8. Retrieve Data Log
Call the Data Reporting API to retrieve the data stored in the cloud. The task ID is required. Additional parameters can be added to filter the data samples, such as the limit specifying the number of data samples per request, the startTime/endTime in Zulu format specifying a time window, and the sensorTaskId for the data samples from a specific sensor, etc. The data reporting API supports the pagination & cursor. If the number of data samples exceeds the limit, of which the default is 500, the nextCursor is then returned in the response. We can then use the cursor in the subsequent requests to get the remaining data samples, until no more the nextCursor in the response.
The following request example does not take any additional parameters, which means it will return the first 500 data samples from all sensors on the specified task ID in descending order by timestamp. Since the task we've created has only one sensor, the additional parameters do not matter much in our case.
### Request example to retrieve the data samples.
curl -L 'https://api.zebra.com/v2/data/environmental/tasks/274fc910-3299-4a16-9a4a-8c4b2ca52e79/log' \
-H 'Authorization: Bearer yourBearerToken'
### Response example of retrieving the data samples. The nextCursor is returned with a value.
{
    "nextCursor": "MjAyMy0wNC0xNFQxODoyMzo1MFp%2BfjM2ZGY5ODRiLWZiMTQtNDhhYy1hNGZhLTA4OTBhNTUyNTg5ZQ%3D%3D",
    "results": [
        {
            "type": "beacon",
            "event": {
                "id": "f48d84d8-57bd-4a1d-af88-db8c9c0eb411",
                "timestamp": "2023-04-14T20:25:05Z",
                "deviceId": "GWJ2150002205BE7425DD7B91C420123790EA20F5792DE",
                "data": {
                    "format": "beacon",
                    "id": "DLJ222700089",
                    "rssi": -49,
                    "value": "18.71"
                }
            },
            "analytics": {
                "tenant": "bb62a0cd13e235750402689a723309b0",
                "recordedTimestamp": "2023-04-14T20:25:15.958Z",
                "resourceId": "3743613a-b8ed-41b1-9016-8c1dda2a365c",
                "timestamp": "2023-04-14T20:25:05Z",
                "meta": {
                    "data": {
                        "taskId": "274fc910-3299-4a16-9a4a-8c4b2ca52e79",
                        "task_alarm": true,
                        "notes": "",
                        "assetIds": []
                    }
                },
                "coordinates": {
                    "global": {
                        "lat": 42.187733,
                        "lng": -87.93319
                    }
                }
            },
            "decode": {
                "temperature": {
                    "sample": 18.71,
                    "taskId": "274fc910-3299-4a16-9a4a-8c4b2ca52e79",
                    "deviation": -1.29,
                    "alert": true,
                    "format": "celsius"
                }
            }
        },

        .
        .
        .

        {
            "type": "beacon",
            "event": {
                "id": "013406e8-e360-4089-bb74-6dc450876161",
                "timestamp": "2023-04-14T18:24:05Z",
                "deviceId": "GWJ2150002205BE7425DD7B91C420123790EA20F5792DE",
                "data": {
                    "format": "beacon",
                    "id": "DLJ222700089",
                    "rssi": -64,
                    "value": "24.93"
                }
            },
            "analytics": {
                "tenant": "bb62a0cd13e235750402689a723309b0",
                "recordedTimestamp": "2023-04-14T18:58:18.141Z",
                "resourceId": "3743613a-b8ed-41b1-9016-8c1dda2a365c",
                "timestamp": "2023-04-14T18:24:05Z",
                "meta": {
                    "data": {
                        "taskId": "274fc910-3299-4a16-9a4a-8c4b2ca52e79",
                        "task_alarm": false,
                        "notes": "",
                        "assetIds": []
                    }
                },
                "coordinates": {
                    "global": {
                        "lat": 42.187733,
                        "lng": -87.93319
                    }
                }
            },
            "decode": {
                "temperature": {
                    "sample": 24.93,
                    "taskId": "274fc910-3299-4a16-9a4a-8c4b2ca52e79",
                    "deviation": 0,
                    "alert": false,
                    "format": "celsius"
                }
            }
        }
    ]
}
The response example above has the nextCursor. It means there are remaining data samples to be retrieved. We make another request by specifying the cursor with the value of the nextCursor in the previous response.
### Request example to retrieve data samples with the cursor
curl -L 'https://api.zebra.com/v2/data/environmental/tasks/274fc910-3299-4a16-9a4a-8c4b2ca52e79/log?cursor=MjAyMy0wNC0xNFQxODoyMzo1MFp%252BfjM2ZGY5ODRiLWZiMTQtNDhhYy1hNGZhLTA4OTBhNTUyNTg5ZQ%253D%253D' \
-H 'Authorization: Bearer br8NlENlY5tK98HQIyVMieV3YD7o'
### Response example of retrieving data samples. No nextCursor in the response. All samples retrieved.
{
"results": [
{
"type": "beacon",
"event": {
"id": "44f45e5c-d52f-42f6-a613-6623e67071d4",
"timestamp": "2023-04-14T18:23:50Z",
"deviceId": "GWJ2150002205BE7425DD7B91C420123790EA20F5792DE",
"data": {
"format": "beacon",
"id": "DLJ222700089",
"rssi": -64,
"value": "24.95"
}
},
"analytics": {
"tenant": "bb62a0cd13e235750402689a723309b0",
"recordedTimestamp": "2023-04-14T18:58:18.141Z",
"resourceId": "3743613a-b8ed-41b1-9016-8c1dda2a365c",
"timestamp": "2023-04-14T18:23:50Z",
"meta": {
"data": {
"taskId": "274fc910-3299-4a16-9a4a-8c4b2ca52e79",
"task_alarm": false,
"notes": "",
"assetIds": []
}
},
"coordinates": {
"global": {
"lat": 42.187733,
"lng": -87.93319
}
}
},
"decode": {
"temperature": {
"sample": 24.95,
"taskId": "274fc910-3299-4a16-9a4a-8c4b2ca52e79",
"deviation": 0.0,
"alert": false,
"format": "celsius"
}
}
},
.
.
.
{
"type": "beacon",
"event": {
"id": "86a847ca-77bb-43e8-8e4d-7de1b9215f6b",
"timestamp": "2023-04-14T18:19:35Z",
"deviceId": "GWJ2150002205BE7425DD7B91C420123790EA20F5792DE",
"data": {
"format": "beacon",
"id": "DLJ222700089",
"rssi": -56,
"value": "24.89"
}
},
"analytics": {
"tenant": "bb62a0cd13e235750402689a723309b0",
"recordedTimestamp": "2023-04-14T18:21:14.513Z",
"resourceId": "3743613a-b8ed-41b1-9016-8c1dda2a365c",
"timestamp": "2023-04-14T18:19:35Z",
"meta": {
"data": {
"taskId": "274fc910-3299-4a16-9a4a-8c4b2ca52e79",
"task_alarm": false,
"notes": "",
"assetIds": []
}
},
"coordinates": {
"global": {
"lat": 42.187733,
"lng": -87.93319
}
}
},
"decode": {
"temperature": {
"sample": 24.89,
"taskId": "274fc910-3299-4a16-9a4a-8c4b2ca52e79",
"deviation": 0.0,
"alert": false,
"format": "celsius"
}
}
}
]
}Conclusion
Zebra Electronic Temperature Sensors solution is a powerful tool for developers to implement some innovative cold chain tracking applications. The cloud-based APIs and the real-time event-driven notifications provide boundless possibilities.

Steven Si