Deploying an application to Zebra Android devices ranging from Jellybean to Marshmallow and beyond
Overview
Native Android applications can be developed for Zebra mobile Android devices such as the TC51, TC55, TC8000 etc. in a number of ways. The primary API for accessing device hardware (e.g. scanner) and Zebra value-adds (known as ‘MX’) is the EMDK.The EMDK is being continually being updated to support new devices and features (download link). One drawback of these continual EMDK updates is that support for older devices can be dropped from newer releases, for example at the time of writing EMDK 6.0 is the latest version but can only support devices as far back as KitKat with Jellybean devices requiring development with EMDK 5.0 or below.
The Problem
A developer targeting a deployment with a mixture of old and new devices will not want to develop separate applications for each device OS.Before discussing an EMDK-based solution it is worth noting that all Zebra devices ship with a zero-code data capture solution known as DataWedge. Using DataWedge as your data capture agent and delivering barcode data etc. via Android intents may be sufficient for some applications and negates the problems with a lack of EMDK support for older devices. DataWedge may not be appropriate for your application however if you require fine grained control of the capture hardware or require access to the MX profile layer.The remainder of this guide assumes that your application requires the EMDK and needs to run across a range of devices from Jellybean to Marshmallow and beyond. This guide supplements the official EMDK documentation and guides for creating enterprise applications, e.g. Creating a project & Creating a profile.
Android Product Flavours
Android build variants provides a solution to the problem as follows:
- In the application build.gradle a flavour is defined for each version of the EMDK we require.
-
In this worked example we will be using EMDK 5 to support JellyBean and EMDK 6 to support Marshmallow, Lollipop and KitKat devices. This gives us support for the full range of Android devices but the details may change in the future e.g. we may need to add a new flavour for EMDK 7 or above for Android O or above.
-
EMDK 5 release notes: https://www.zebra.com/content/dam/zebra_new_ia/en-us/software/developer-tools/emdk-for-android/EMDK%20for%20Android%20Version%205.0%20Release%20Notes.pdf
-
EMDK 6 release notes: https://www.zebra.com/content/dam/zebra_new_ia/en-us/software/developer-tools/emdk-for-android/EMDK-for-android-version-6.0-release-notes.pdf
-
-
By defining different source sets we can ensure the correct EMDKConfig.xml (defining our application’s MX profiles) will be used
-
The output from the build process will be multiple apks but critically the source code remains unchanged between variants, we are just ensuring the correct EMDK library is being used.
Define the product flavours
In the app build.gradle file define product flavours as follows:
android { ... productFlavors { emdk6 { targetSdkVersion 23 minSdkVersion 19 // EMDK 6.0 supports as far back as KitKat (19) versionCode 30000 + android.defaultConfig.versionCode versionNameSuffix "-emdk6" } emdk5 { // Not compatible with Marshmallow devices minSdkVersion 16 targetSdkVersion 16 // Though EMDK 5 actually supported up to Lollipop, we are only using it for JB deployments maxSdkVersion 22 // Note: Google would still allow installation on 23+ devices (https://developer.android.com/guide/topics/manifest/uses-sdk-element.html) versionCode 75000 + android.defaultConfig.versionCode versionNameSuffix "-emdk5" } } }
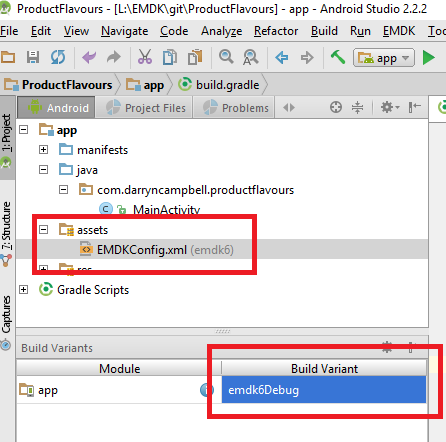
And sync your gradle project.You can now observe that your Build Variants pane in Android Studio (Build > Select Build Variant) contains entries for each of the defined flavours:

EMDK Installation
You will need to obtain the appropriate EMDK libraries, which in the case of this worked example are EMDK 5.0 and EMDK 6.0. Although the EMDK is currently delivered as a series of EMDK add-ons, you can extract the jar file from the add-on and use the jar directly in your project as a provided library and this is required by the next step. I personally find it easier to copy the jar files into my project to avoid installation dependencies. You may find it easier to extract the jar file from the EMDK Mac distribution as this is provided as a zip file.

Referencing the Jar from Gradle
We will be specifying a runtime dependency for our EMDK library similar to what is done in the official documentation when creating an application to run on non-Zebra devices, as explained here.Gradle enables you to specify dependencies as {flavour}Compile, as explained in the gradle docs. The simplest setup that works for us will be to specify the application dependencies as follows, using Provided instead of Compile:
dependencies { // NOTE: This gradle depends on the EMDK Jars associated with EMDK 5 & 6 being in the following directories emdk5Provided fileTree(include: ['com.symbol.emdk.jar'], dir: 'lib\\emdk5.0') emdk6Provided fileTree(include: ['com.symbol.emdk.jar'], dir: 'lib\\emdk6.0') compile fileTree(exclude: ['com.symbol.emdk.jar'], dir: 'libs') compile 'com.android.support:appcompat-v7:23.1.0' } It is also possible to specify separate dependencies for Debug and Release (e.g. emdk5DebugProvided) but in this case that is not required. Note that the above setup does depend on you having previously copied the EMDK lib jars to your project’s ‘lib’ folder.
Choosing a build variant
In general, you should choose the API level that matches your deployment target, just as you do when selecting an Android targetSdkVersion. There is nothing technically wrong with running an API 22 application on a Marshmallow (23) device, you just won’t get access to Marshmallow features.Our example setup has two build flavours, emdk 5 and emdk6. This was done to enable us to support JellyBean, KitKat, Lollipop and Marshmallow. There is an overlap of supported variants with EMDK 5 supporting JB, KK and L and EMDK 6 supporting KK, L and M. When building for JB we must choose the emdk 5 build flavour, when building for M we must choose the emdk 6 build flavour.
Using Source Sets to define the assets to use
Application interaction with MX Profiles is achieved through the EMDK Profile manager and visually through a plugin to the Android Studio IDE (EMDK > Profile Manager)

Profiles are defined as XML and stored under
The version of MX resident on the device will have a number of capabilities with additional capabilities being added in each MX release. Newer capabilities will not be available to older devices. A full compatibility table is available from this link but for the purposes of this document we will assume that the desired profiles could differ between Jellybean, KitKat, Lollipop and Marshmallow devices. In practice since each release of EMDK supports multiple Android dessert letters you would not have separate XML files for each Android letter.Android uses the concept of Source Sets to define which source files are used for each of the product flavours. Whilst this principle can apply to java files, manifest files, aidl, jni etc we are most interested for this purpose in specifying different assets for each of the product flavours.Modified from the Android docs:
-
Open the Project pane and select the Project view from the drop-down menu at the top of the pane.
-
Navigate to MyProject/app/src/.
-
Right-click the src directory and select New > Folder > Assets Folder. Note: You may need to untick the setting ‘compact empty middle packages’
-
From the drop-down menu next to Target Source Set, select emdk6
-
Click Finish
-
Add the required EMDKConfig.xml file to the newly created folder under
\app\src\emdk6\assets
The EMDKConfig.xml under the emdk6\assets folder will be used whenever a build of that flavour is created. Repeat these steps for emdk5. Note A complication here is that the EMDK Profile Manager from Android Studio (EMDK > Profile Manager) will always look for the EMDKConfig.xml file under \main\assets\, care should be taken to ensure the correct EMDKConfig.xml file is located in the appropriate
Worked Example
There is a worked example available from https://github.com/darryncampbell/ProductFlavours which shows the principles discussed in this blog. Note that as explained earlier, it is necessary to copy the appropriate EMDK jar files into the project ‘lib’ directory. The example shows a simple PowerManager profile that will turn the screen off when invoked, by selecting the appropriate build variant the same application can run on both JB and M devices

Power Manager example on M device

Power Manager example after turning screen off (ha ha)

Anonymous (not verified)