
Use of Manage External Storage Permission on Zebra Devices
Overview
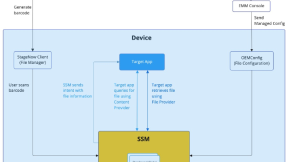
Since Android 10, all Android devices are now affected by the Scoped Storage restrictions. These restrictions were introduced to limit the App's interaction with the folders and files on the external storage of the device. There are different alternatives which you can use and each one of them has it's pros and cons. We can find SSM, the use of MediaStore and also this particular permission (which we're going to talk in this post) among the alternatives available to comply with the SS restrictions.
The Permission
This permission is very particular and powerful at the same time because any application who manage to get it granted from user side, will have complete access to the files and folders on the external storage of the device or... almost!
There are still going to be some limitations where even by using this permission will still not be possible to manage specific files/folders, like in these scenarios:
- Write access will not be possible in these directories: /sdcard/Android/data and most subdirectories of /sdcard/Android but not in the /sdcard/Android/media because this directory is considered as part of the shared storage of the device;
- Access to app-specific directories belonging to other applications will not be possible because these are going to be treated as subdirectories of /sdcard/Android/data;
It's not a runtime permission, which means that the request should normally be done by launching a specific screen in the System Settings through an Intent with a special action: ACTION_MANAGE_APP_ALL_FILES_ACCESS_PERMISSION.
The normal process takes time and requires the user input anytime we want to ask this permission. With MX there's already a way which we can use to achieve this and this is done by using the AccessMgr APIs.
Pros & Cons
Everything is too good to be true doesn't? Yes, you're right, because even if this permission is among the alternatives recommended by Google, it does come with a big drawback. It will be extremely difficult to publish/update your application on the PlayStore once you add this permission to the Manifest because it is marked as a dangerous one for the end-user and only specific applications are whitelisted and are able to include this permission.
Usually, these kind of applications are:
- Antivirus applications
- File Explorers type of applications
In order to get the approval from the Google Play Team, you will have to fill a specific form where everything will have to be explained in details on why your application uses this permission. Very similar approach as for other type of permissions such as the Background Location Permission, but much more stricter.
The approach doesn't change that much either for the Enterprise Google PlayStore, as it is considered a grey area and even if you manage to get an approval for this permission, policies might change in the future and your application might get unpublished if those policies are not met.
If you plan to distribute your application internally and you have no plans on publishing it on the Play Store, then this alternative should work just fine but keep in mind that, if in a remote future the application will have to be published on the Store, you might not be able to do that without valid reasons.
The permission has been introduced in Android 11 and for now it is confirmed to be available & working on Android 14 as well ,with no notice of deprecation jumping to Android 15.
Implementation
There are a couple of ways you could grant this permission automatically with MX:
- By dynamically pushing an XML profile with ProfileManager from your application directly
- By creating an XML profile with StageNow, export it and scan the barcode to stage the configuration on the device
- Create an application only for this purpose, so, process the XML profile from this application to grant the permission to another application or applications
In this guide, we will only focus on how to create the profile and how to process it in from a sample Android project and for that we will also use the EMDK Profile Manager Wizard Plugin. To download the plugin please follow the instructions as described here: EMDK Setup
Assuming you already have your project created, let's add the required dependencies before continuing:
// EMDK Loader
implementation 'com.github.nilac8991:emdk-loader-lib:1.0.2'

// EMDK
implementation 'com.symbol:emdk:9.1.1'
The EMDK Loader is a personal library which I've created to cover some logic related on how the EMDK library is initialized and how the profile is processed. I am going to use this library to cover the profile processing part but, if you don't want to use third party libraries in your project please refer here: EMDK Setup on how to add the EMDK library to your project and here: Use of ProfileManager on how to process profile configurations with ProfileManager.
Once we have everything settled, let's start by adding the permissions to the Android Manifest:
<uses-permission android:name="android.permission.WRITE_EXTERNAL_STORAGE" />

<uses-permission
    android:name="android.permission.MANAGE_EXTERNAL_STORAGE"
    tools:ignore="ScopedStorage" />
Now, let's begin on creating the profile...
- Open the EMDK Profile Manager from the Toolbar of Android Studio and create a new profile as shown in the screenshot (You can use any name you want for the profile)

- From the opened window, click on Access Manager from the available features and add it to the selected features as shown in the screenshot
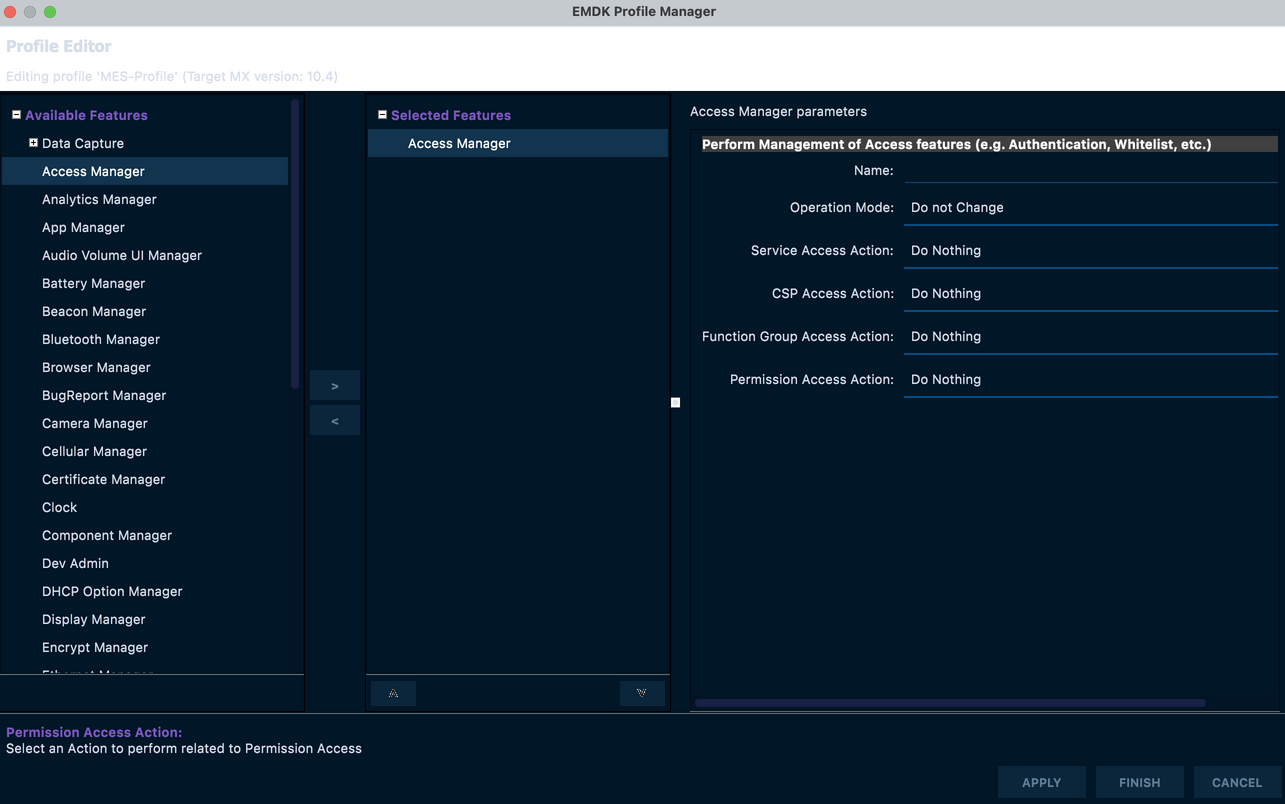
- From there, we're only going to work with the Permission Access Action: from the selector, pick: Grant Permission to an Application
- Permission Name: should be Manage External Storage
- Application Package Name: should be the one which should have the permission granted. It can be this specific application or a different one
- Application Signature: the application signature should represent the exported certificate of the keystore which you're going to use to sign your application and this cert should be in a base64 format. To know how to pull the signature from an apk, please refer to this guide: SigTools
- After you have exported your signature, attach the file to the selector and click finish
-
You should now be able to see a new EMDKConfig.xml file in the assets folder in your project and it should look something similar like this:
<?xml version="1.0" encoding="UTF-8"?><!--This is an auto generated document. Changes to this document may cause incorrect behavior.-->
<wap-provisioningdoc>
    <characteristic type="ProfileInfo">
        <parm name="created_wizard_version" value="11.0.1" />
    </characteristic>
    <characteristic type="Profile">
        <parm name="ProfileName" value="MES-Profile" />
        <parm name="ModifiedDate" value="2022-08-02 09:17:38" />
        <parm name="TargetSystemVersion" value="10.4" />
        <characteristic type="AccessMgr" version="10.4">
            <parm name="emdk_name" value="" />
            <parm name="PermissionAccessAction" value="1" />
            <parm name="PermissionAccessPermissionName"
                value="android.permission.MANAGE_EXTERNAL_STORAGE" />
            <parm name="PermissionAccessPackageName" value="com.zebra.nilac.mestest" />
            <parm name="PermissionAccessSignature"
              value="TUlJQzVEQ0NBY3dDQVFFd0RRWUpLb1pJaHZjTkFRRUZCUUF3TnpFV01CUUdBMVVFQXd3TlFXNWtjbTlwWkNCRVpXSjFaekVRTUE0R0ExVUVDZ3dIUVc1a2NtOXBaREVMTUFrR0ExVUVCaE1DVlZNd0lCY05Nakl3TlRFeU1EZzFOREExV2hnUE1qQTFNakExTURRd09EVTBNRFZhTURjeEZqQVVCZ05WQkFNTURVRnVaSEp2YVdRZ1JHVmlkV2N4RURBT0JnTlZCQW9NQjBGdVpISnZhV1F4Q3pBSkJnTlZCQVlUQWxWVE1JSUJJakFOQmdrcWhraUc5dzBCQVFFRkFBT0NBUThBTUlJQkNnS0NBUUVBcUZPTjd4bkxqVUNCYXU0WktnVmxnTjBqZFA5SmZjS0U4bmV2N0Y1ZUQvT2VMWk9SL0dDVnpKcmoyOU1vaFIyZW9uVkRXTStrQ2RCa3RoOFdic01nYzlvTElrZGhxMU9lT0gySmpRUlYzOFg0TVFmUi9sZHovTm9WTFBqOW95Q05FQkV2ekNlMXo5c2lIS05XcFNxY1pqNmFpbXFweUhrQkgrMm1EOVBLeXQ0YTY1MjBKKzYxRTFNT0ppUzM5Q2g4cE54SnNKNWM5L3cxSGIyc1VSWUxlMzNUUE9aZmhqY3FoNUJoTm4rcVZCb1V2YWJjS3VWeGgrbTArbHRhTTFuSGJGcEtNYStmb1FWc2JRQjh3bUxpQjdGK3lFMlIwZDRVbUJxRXJBTS90UU9LcDBaTHUzTDFqeVNiUkxTMVNmK0liVDh5bW5pcndjdk1YQy9LelEvbEZRSURBUUFCTUEwR0NTcUdTSWIzRFFFQkJRVUFBNElCQVFDRitKUkFDOGtQdUFKeEl4Vk94Q0x3Y1hTNUZ2d053YmdFdmg4aEViQUp3WVllbE42d2VxOUVtWnVyZlN6R214UGtoU2lxcDZGOWJpVGNISFVPS0dSOVl0eTF1WmtvUmwxLytWTFZ6R3J2UGZkRndHb1hYb1NCUHJ4M0xqMzZSeXNadzBrd3dKTUQrNW92VHplbXNpVmptOTJZckF4RlhPOFhoWFJWSEdtbmNMUk5pMzZNem02VmR0bmhrSUtsQUxGTFl2eEhFUXBnaE93MksxUG81WEpxRnc1dHdRc3Yrc25vRnJqdis4ZjhNbHRvcUV1Vm5VaFAvTlJBRjFrVWJ0MUloZ1B6eDBtNUhYQUhmbDVTMDZwOTdVYklGdG12Qk5TRlF5TU13b1RYVXZXY0l1SFBJbWNDRGRGY0IxZzRqLy9UbHpuRTh2Z2twaUNyUVYvcTJ6Yjg=" />
        </characteristic>
    </characteristic>
</wap-provisioningdoc>
-
Now, let's write some code and initialize the EMDK first:
Log.i(TAG, "Initialising EMDK Manager")

private fun initEMDKManager() {
    //Initialising EMDK First...
    Log.i(TAG, "Initialising EMDK Manager")

    EMDKLoader.getInstance().initEMDKManager(this, object : EMDKManagerInitCallBack {
        override fun onFailed(message: String) {
            Log.e(TAG, "Failed to initialise EMDK Manager")
        }

        override fun onSuccess() {
            Log.i(TAG, "EMDK Manager was successfully initialised")

            grantManageExternalStoragePermission()
        }
    })
}

companion object {
    const val TAG = "MainActivity"
}
-
Once we have green light from the EMDK and it is confirmed to be initialized, we can now process the profile from the assets folder:
private fun grantManageExternalStoragePermission() {
    Log.i(TAG, "Granting External Storage Permission through MX")
    ProfileLoader().processProfile(
        "MES-Profile",
        null,
        object : ProfileLoaderResultCallback {
            override fun onProfileLoadFailed(message: String) {
                Toast.makeText(
                    this@MainActivity,
                    "Failed to process profile! Check logs...",
                    Toast.LENGTH_LONG
                ).show()
            }

            override fun onProfileLoaded() {
                finish()
            }
        })
}
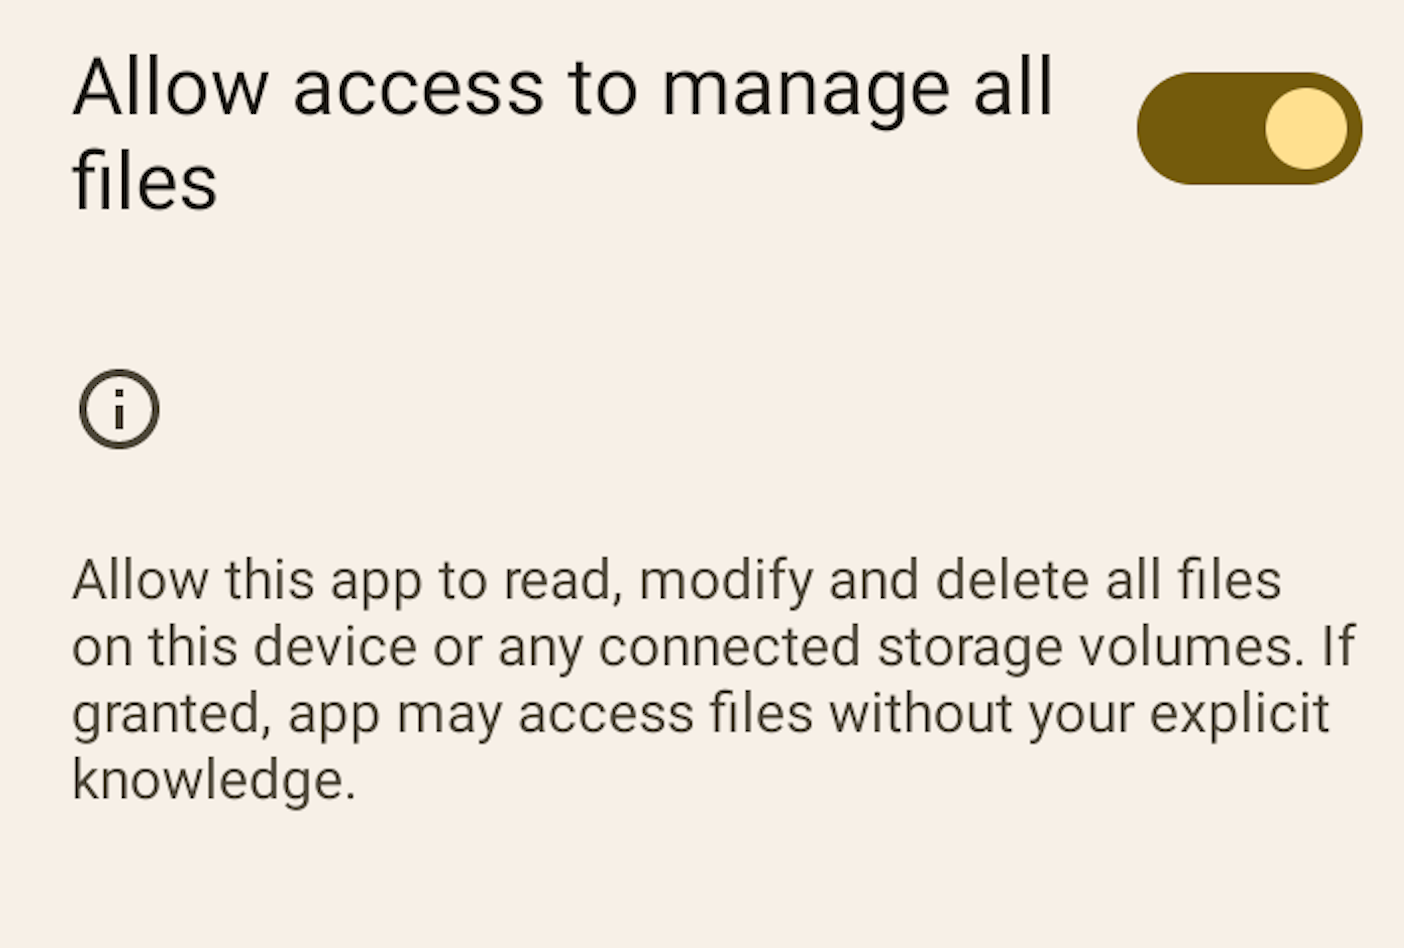
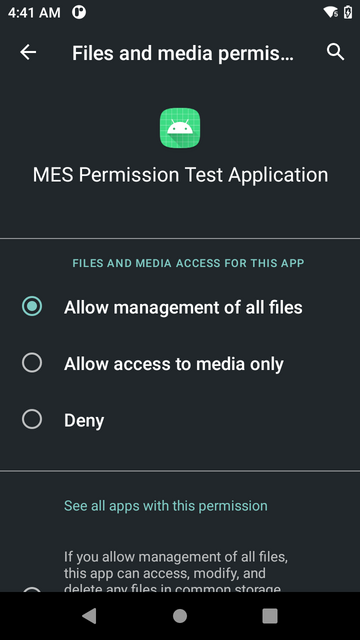
Now that we have all the pieces, it's time to launch our application and see if it works. Normally, if you have followed everything correctly, the application will process the profile successfully. And, if you go to the System Settings and check the permissions of your application, you will see that the Manage External Storage permission has been granted as seen in this screenshot:
Notice
If you experience problems when you try the application and the permission is not being granted check this:
- In the XML please check if the signature string is exactly the same as the one you exported previously with SigTools
- Make sure the package name is exactly the same as the one on which you plan to apply the permission
- Please make sure you have both Files permissions included in the Android Manifest
If you have any other issues or queries about it, please drop a comment or check the Full source code of the project and do a crosscheck on whatever you might be missing or doing wrong.

Daniel Neamtu