
Using Link-OS SDK for Webservices to Print from Websites
Using Link-OS SDK for Webservices to Print from Websites
One of very important components in Link-OS Multiplatform SDK is the support for Webservices. The Link-OS SDK for Webservices enables developers to quickly develop a web application to connect to Zebra Link-OS printers securely through the WebSocket, and provides a wide range of APIs for printer discovery, printer connectivity, printer status alerts, printer management, template filling, and so on to handle printing related functions. Developers can use this SDK to create solutions to print receipts or labels from anywhere to any connected printers.
In this article, we provide a step-by-step guide on how to set up a web project in Eclipse with Link-OS SDK for Webservices in a PC environment.
Prerequisites
- Download and install Java JDK version 7 or later to support Tomcat WebSocket. You also need to set up $JAVA_HOME environment variable to point to the installation location of JDK.
- Download and install the Link-OS Multiplatform SDK on to your PC. Pay attention to the installation path, which is where the Link-OS SDK for Webservices to be installed. If you accept all the defaults during the installation, for example, the path of Link-OS SDK for Webservices will be C:\Program Files\Zebra Technologies\link_os_sdk\Webservices\v14.5198 for the latest SDK version of v14.5198.
- Download and install Tomcat v7.0.33 or later from here. The Link-OS SDK for Webservices utilizes Tomcat based implementation of WebSocket. It’s recommended to download the standalone instead of the Windows Service Installer version. Refer to here for setup. You need to set up $CATALINA_HOME environment variable to point to the installation location of Tomcat. To verify the setup, run the $CATALINA_HOME\bin\startup.bat script. If the setup is successful, you can access the page of http://localhost:8080/. Otherwise, check the logs in $CATALINA_HOME\logs folder for errors. To shut down, run $CATALINA_HOME\bin\shutdown.bat.
- Download and install Eclipse IDE for Java EE Developers. We will discuss the setup in the later section.
Obtain Certificate & Configure Printer Weblink
The Link-OS SDK for Webservice utilizes Tomcat based implementation of Weblink / WebSocket. The Weblink connections between the server and the Link-OS printers use SSL/TLS for secured communication. In order to establish the secured communications between your server and a Link-OS printer, you will need to obtain a signed certificate from Zebra. The Certificate Generation has the detailed steps on how to use OpenSSL commands to generate a certificate and how to get it signed by Zebra. You need to follow these steps thoroughly in Certificate Generation guide.
Extra Steps:
-
After the Step 5 in Certificate Generation guide, you need to copy the generated *.p12 certificate file, i.e. the Personal Information Exchange file, to $CATALINA_HOME\conf folder.
- In the Step 6 in Certificate Generation, you can change the port number for the Weblink in the
configuration block, if the port 443 is already in use. The log in $CATALINA_HOME\logs folder should tell you whether the port 443 is already occupied. - In the Step 10 in Certificate Generation, use the following configuration string to configure the printer’s Weblink. Make sure the date and time are the current date and time, as they will be used for certificate validation. The domain part of the URL should match with what you have chosen in the Step 3 in Certificate Generation. The port number should match with the port number specified in the Step 6 in Certificate Generation.
{}{
"rtc.time":"09:10:00",
"rtc.date":"02-27-2020",
"weblink.logging.max_entries":"500",
"weblink.ip.conn1.location":"https://mypc.weblink.zebratest.lan:443/zebra/weblink/",
"device.reset":"1"
}
The above JSON string can be sent to the printer as a file by using the Printer Setup Utility for Windows, Android or iOS
Notes:
- There should be no space between the braces in the above JSON string, i.e. no spaces between "{}{".
-
You can have two Weblinks configured at the same time in Link-OS printers, i.e. weblink.ip.conn1.location and weblink.ip.conn2.location. However, they cannot point to the same Weblink URL. If they point to the same Weblink URL, they will cancel each other’s connection and cause a ping-pong effect. Refer to the Using Weblink section in ZPL User’s Guide for additional info.
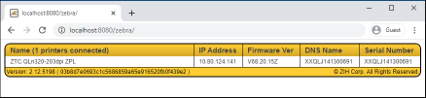
If you have done all the steps as described above correctly, you should see the following page in a browser with the URL of http://localhost:8080/zebra/
Configure Tomcat in Eclipse
Since our goal is to develop a web application based on Link-OS SDK for Webservice, we need to configure Tomcat in Eclipse. Here are the steps.
- Launch Eclipse.
-
Click on Window -> Preferences -> Server -> Runtime Environments.
-
Click on Add to add a Server project.
-
Select Apache Tomcat v7.0 and check the box of Create a new local server, then click Next.
-
Click Browse… button and point to the installation location of Tomcat.
-
Ensure the JRE selected is v1.7 or later, and has trusted the ZebraCAChain.cer certificate, as performed in the Step 7 in Certificate Generation. Then click on Finish.
-
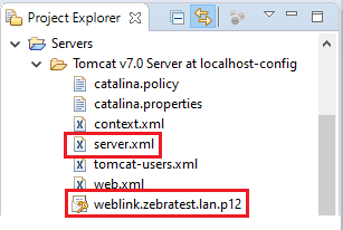
Copy the *.p12 file generated from the Step 5 in Certificate Generation to the Servers -> Tomcat v0 Server at localhost-config in the Project Explorer.
-
Open the server.xml file in the Server project, and add the
configuration block as instructed in the Step 6 in Certificate Generation.
Create Web App in Eclipse
There are two approaches to start a web app with Link-OS SDK for Webservices.
Approach One
Start with ZebraWebServiceDeveloperDemo, which comes with the SDK release in %SDK_INSTALL_PATH%\link_os_sdk\Webservices\v2.14.5198\demos\eclipse\ZebraWebServiceDeveloperDemo folder.
This is the easiest way to get started. You simply import the ZebraWebServiceDeveloperDemo project into Eclipse. This demo project already has all the necessary libraries and a servlet. The servlet is called WeblinkServlet. Once it’s imported, you follow the steps below to add the WeblinkServlet to the Server.
-
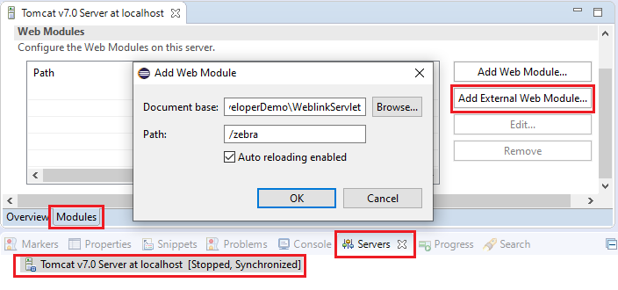
In the Servers tab in Eclipse, double click on your Tomcat server to open the Server configuration page.
-
Click on the Modules tab on the lower left of the Server configuration page.
-
Click on Add External Web Module...
-
In the Document Base field, click on the Browse… button to navigate to your project location, and select the WeblinkServlet folder.
-
In the Path field, enter /zebra and click OK.
- Save the Server configuration.
-
Now you can launch ZebraWebServicesDeveloperDemo by selecting Run As->Run on Server.
Note: If Tomcat server is already running from its installation location, you need to stop it (shutdown.bat) before you start the server in Eclipse.
You can now access the http://localhost:8080/zebra and http://localhost:8080/ZebraWebServicesDeveloperDemo/ to play around. Congratulations! Now you can use this dev demo as a starting point to develop your own web app.
Approach Two
Start with zebra.war, a servlet released with the SDK in %SDK_INSTALL_PATH%\link_os_sdk\Webservices\v2.14.5198\lib folder.
In this approach, you create a web application as you normally do in Eclipse. Then, add the Zebra servlet to your web app through the following steps.
-
Copy the %SDK_INSTALL_PATH%\link_os_sdk\Webservices\v2.14.5198\lib\zebra.war to a folder, for example, named as WeblinkServlet on Desktop.
- Open a Command window from that folder and run the following command to extract the content from the *.war file.
C:\Users\me\Desktop\WeblinkServlet> jar -xvf zebra.war-
Remove the zebra.war file from the folder and copy the WeblinkServlet folder along with its content to the root of the web project you’ve just created in Eclipse.
- Now, you need to go through the Step 1 to Step 6 in Approach One section above to configure the Server.
Now, you just have successfully added the Zebra Weblink servlet to your web app. Then you can add additional library files of Link-OS SDK for Webservices as needed by starting with ZDK_API.java. These library files are the same set of library files of Link-OS SDK for PC Java, which can be found in %SDK_INSTALL_PATH%\link_os_sdk\PC\v2.14.5198\lib folder.
Thank you for reading through this article. Hope it is helpful. If you have any questions or comments, please post them on this thread. Your feedback is very much appreciated. As always, happy coding!

Steven Si
Replies