Convert Stagenow Profiles for Use with Wifi Storage Devices
Ian Hatton
Zebra EMEA , October 19
Overview
The Remote Hosting method outlined in a previous blog post here (http://developer.zebra.com/blog/stagenow-3x-remote-xml-hosting-v2 ) details how to remotely host a StageNow profile and files on a server (generally an internet server) . In cases where internet access is not available or bandwidth over the network is limited , it may be preferable to host files locally on a wireless storage device e.g. when performing an OS update on site. The method below explains how to automatically convert the existing remotely hosted files to work from a local server which in this instance is either :
- a Sandisk Connect Wireless Stick (https://www.sandisk.co.uk/home/mobile-device-storage/connect-wireless-stick) . This is a low cost , highly portable device with 16GB to 256GB capacity which is widely available and provides a very small & lightweight wireless HTTP file server.
- a Zebra Android device (can be any unit running Nougat or later such as the TC2x/5x/7x/PS20/EC30 ). The StageNow profile below should be scanned on the Zebra host device after preconfiguring an internet connection and will download and install the required utilities to allow the device to be configured as a HTTP WiFi Direct server.
Converting a remotely hosted XML profile for Sandisk Wireless Stick
- Deploy and test the remote XML profile using the method from the original blog article link http://developer.zebra.com/blog/stagenow-3x-remote-xml-hosting-v2
Make sure that the version of the tools being used is remotehostingv2.zip or later (since this contains the new batch files to manipulate the profiles)
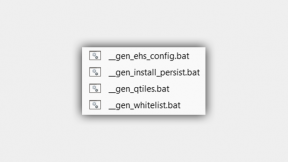
- In the root of the working/installation folder , run the batch file command :
Xml_sandisk.bat projectname
Where projectname is the name of the remote profile to convert
- Insert the Sandisk Wireless Stick into your PC , create a folder named ‘stagenow’ in the root and then copy the projectname folder to this sub-folder (including the folder contents)
- Ensure that Sandisk Wireless stick is ejected from PC (otherwise WiFi connection is not available)
- Connect the test device to the Sandisk WiFi network using the previously configured wireless credentials (these are setup via the Sandisk configuration webpage)
- In StageNow on your PC , access All Profiles , click on Import and then select the _sandisk_import_to_stagenow.xml file from the project folder on the PC
- Rename the imported profile to indicate that it is hosted on the stick e..g projectname_sandisk
- Generate the barcode for the profile
- Scan barcode on test device to deploy
- In the case of a failure, check that there is a working HTTP path to the device by entering the URL below in the browser on the client device :
http://172.25.63.1/wfd/stagenow
Sandisk Performance Notes:
- Sandisk Wireless Stick supports 3 concurrent connections : https://kb.sandisk.com/app/answers/detail/a_id/18544/~/sandisk-connect-maximum-number-of-simultaneous-streams
- 1.3GB OS Update Zip file takes approx. 8 mins to download to a device with one connection active
- Battery life of the stick is up to 4.5 hours continuous use and operating range is up to 45m line of sight: https://kb.sandisk.com/app/answers/detail/a_id/17550/~/sandisk-wireless-stick-technical-specifications
Converting a remotely hosted XML profile for Zebra Device
- Deploy and test the remote profile using the method from the original blog article link (http://developer.zebra.com/blog/stagenow-3x-remote-xml-hosting-v2)
- In the root of the working/installation folder , run the batch file command :
Xml_direct.bat projectname
Where projectname is the name of the remote profile to convert
- Copy the project folder and it’s contents from the PC to the Zebra device under the existing /sdcard/stagenow folder
- On the Zebra host device , run PDANet and configure WiFi Direct as per the steps below:
- Check WiFi Direct Hotspot – blue panel should appear containing the network name and password to use for connecting devices
- Either manually configure the client device(s) to be staged with the network details shown in the above screen (which will vary from one device to another) or if your device OS supports WPS Push Button ( OS versions prior to Pie , should be under Wireless Advanced settings) you can press the WPS button in PDANet and then enable this mode on the client device in order to automatically connect . After connection, the MAC address of the client device(s) should be visible in the PDANet blue status panel as shown below.
Note: When connected to the host device , there will normally be a message indicating that this network does not have internet access – this can be ignored as the default action is to stay connected to the network if using Nougat or later
- On the host device, run SimpleHTTPServer and press the On button to enable the server :
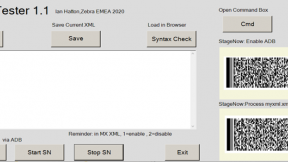
- On the host device, run StageNow NFC Writer and browse to the projectname folder , then select the file _direct_import_to_stagenow.xml and long press to popup the context menu below. Select ‘Display barcode’ to display a single staging barcode on the display of the host device. NFC can also be used and you can bump the two devices (host and client) together in order to transfer the profile.
- On the client device, run StageNow and read the barcode / bump the host device in order to start the staging process.
- In the case of a failure, check that there is a working HTTP path to the device by entering the URL below in the browser on the client device :
http://192.168.49.1:12345/stagenow/
Performance Notes:
-
- WiFi Direct supports 5 to 6 concurrent connections
- 1.3GB OS Update Zip file takes approx. 4 mins to download to a device with one connection active
- Will have significant impact on host device battery life when WiFi Direct server is enabled

Ian Hatton
1 Replies
If you have issues viewing the embedded images in this blog , the original article is posted as a PDF document <a href="http://zebra.airsetup.com/2019/blogs/Convert%20Stagenow%20Profiles%20fo…;


